Overview
Configure SPF, DMARC, and DKIM records to improve email deliverability and inbox placement.
Prerequisites
- Custom domain (not free email providers like Gmail, Yahoo, etc.)
- Access to your domain's DNS settings
- Active email service provider (ESP) account Note: Skip this setup if you're using a free email address (e.g., @gmail.com, @yahoo.com).
Add SPF Record
SPF verifies which servers can send email on behalf of your domain.
- Identify your ESP from the table below.
- Copy the corresponding Value.
- Create a TXT record in your DNS with that value.
| Email Service Provider | SPF Value |
|---|---|
| Google Workspace | v=spf1 include:_spf.google.com ~all |
| Microsoft 365 | v=spf1 include:spf.protection.outlook.com ~all |
| Zoho Mail | v=spf1 include:zoho.com ~all |
| SendGrid | v=spf1 include:sendgrid.net ~all |
| GoDaddy | v=spf1 include:secureserver.net ~all |
| Amazon SES | v=spf1 include:amazonses.com ~all |
| Yahoo Mail | v=spf1 include:_spf.mail.yahoo.com ~all |
| Yandex Mail | v=spf1 include:_spf.yandex.net ~all |
Tip: If you use multiple services, combine them: v=spf1 include:_spf.google.com include:sendgrid.net ~all
Add DMARC Record
DMARC tells email providers how to handle messages that fail SPF/DKIM checks.
- Go to DMARC Generator or similar tool.
- Enter your Domain.
- Click Submit.
- Click Finish.
- Copy the generated DMARC value.
- In your DNS, create a TXT record with the copied DMARC value.
Add DKIM Record
DKIM adds a digital signature to verify email authenticity.
- Generate DKIM in your ESP (Google Workspace, Microsoft 365, Zoho Mail, etc.).
- Copy the DKIM public key and selector name provided by your ESP.
- In your DNS, create a TXT record:
- Name/Host: Your DKIM selector (e.g.,
google._domainkeyorselector1._domainkey). - Value: The DKIM public key from your ESP.
- Name/Host: Your DKIM selector (e.g.,
Note: Contact your ESP directly if you need help generating DKIM. The record name and value depend on your provider.
Find your DKIM identifier (selector)
SalesBlink checks DKIM using your DKIM identifier, also called the selector. The selector is the part of the DKIM record name that comes before ._domainkey. For example, in google._domainkey.yourdomain.com the identifier is google.
Note: The identifier is not the record value. Do not paste the long public key (
v=DKIM1; k=rsa; p=...) or a CNAME target into the DKIM Identifier field. Enter only the selector.
| Email provider | Typical DKIM identifier |
|---|---|
| Google Workspace | google |
| Microsoft 365 / Outlook | selector1 or selector2 |
| cPanel hosting / Namecheap Private Email | default |
| Hostinger | hostingermail-a |
| mailcow | dkim |
| Zoho Mail | The selector name you chose when you generated DKIM in Zoho |
| Amazon SES | The token before ._domainkey in each of the CNAME records SES gives you |
If your provider is not listed, open your DNS records, find the TXT or CNAME record whose name contains ._domainkey, and copy the text before ._domainkey.
Note: SalesBlink accepts DKIM published as either a TXT or a CNAME record (for example, with Amazon SES). It looks up
<identifier>._domainkey.<your sending domain>, so if you send from a subdomain, the DKIM record must exist on that subdomain. A red DKIM line in the Domain Setup Report does not stop sending.
Verify Your Setup
DNS changes can take up to 24 hours to propagate worldwide.
- Use a DNS lookup tool (e.g., MXToolbox, Google Admin Toolbox).
- Check that SPF, DMARC, and DKIM records are visible.
Frequently Asked Questions
DKIM is set properly but SalesBlink is not recognizing it?
SalesBlink ensures DKIM by using the identifier. First, find your DKIM identifier from your DNS records. It is generally what comes in the Name/Value field right before the first dot (.).

In the above example, “google” is the DKIM identifier.
To set your DKIM Identifier on SalesBlink:
- Head over to Email Senders.
- Bulk select all the senders which share the same DKIM identifier.
- Click on “Sender Settings”.
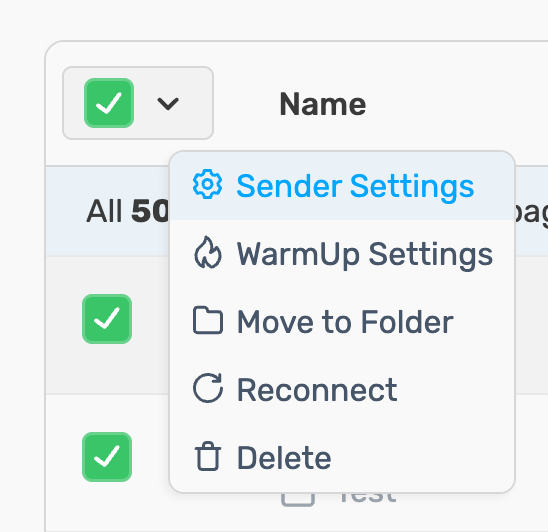
- Uncheck other settings & enter your DKIM identifier.

- Click Save.
- Within 48 hours, SalesBlink will automatically recheck your domain health and update your Domain Setup Report.
Why do I get "Enter a valid DKIM identifier." when I bulk update sender settings?
When you select several senders and open Sender Settings to change something else (for example, the daily sending limit), each setting has its own checkbox. Update DKIM Identifier is ticked by default. If it stays ticked while its field is empty, saving fails with Enter a valid DKIM identifier. Untick Update DKIM Identifier before you click Save, and tick only the settings you want to change.
What does "Set DKIM Identifier to check" mean?
The Domain Setup Report needs your DKIM identifier before it can check your DKIM record. Find the identifier with the provider table above, then set it from the gear icon next to the DKIM check or through bulk Sender Settings as described above.