Overview
Email WarmUp improves your domain reputation and email deliverability by automatically sending emails, opening them, clicking links, and moving emails from spam to inbox. We have 100,000+ Active email addresses in our warmup pool network.
Prerequisites
Email WarmUp available in your plan
Email sender(s) connected to SalesBlink
Sending and Receiving both enabled for the sender (WarmUp is only active when both are on)
For IMAP senders, your Inbox & Spam folders must be selected (required for WarmUp/Inbox features to work)
Note: Email WarmUp is not available for SMTP-only email accounts.
Why Emails Go to Spam
Low open rates (<10%)
Low reply rates (<2%)
Emails consistently landing in spam
Spammy subject lines or content
Technical setup issues (SPF, DKIM, etc.)
Unsafe or flagged links
How Email WarmUp Works
When enabled:
SalesBlink sends emails between addresses in the WarmUp network
Emails are opened, links clicked, and replies sent
Emails are moved from Spam to Inbox
All activity happens automatically while your sender is connected
Improves reputation for everyone in the pool
A few things to expect:
- New senders start slowly. WarmUp takes 24–48 hours to fully activate for a newly enabled sender.
- Spam to Inbox numbers can lag. Emails moved from spam to inbox may show in the WarmUp Report on the next day.
- WarmUp has its own schedule. By default, warmup emails are sent throughout the day, every day, independent of your sequence sending hours. To limit warmup to certain days and times, tick Send WarmUp Emails Only On Selected Days & Times in the WarmUp Settings modal and choose a timezone, days, and time slots.
- Keep WarmUp on during campaigns. Don't turn it off when you start sending sequences. Consistent warmup keeps your sender healthy.
- Variables and spintax are not rendered in warmup emails. You may see raw text such as
{{first_name}}in a warmup email. This is harmless.
Warmup emails in your Sent folder are normal
WarmUp sends real emails from your mailbox, so you will see them in your Sent folder, and replies from pool mailboxes in your inbox. This is expected and does not mean your account was accessed by someone else.
To keep them out of the way, set up a filter using your Warmup Filter Tag. Don't delete warmup emails: they are part of how WarmUp measures your sender.
Recommended WarmUp Duration
- New domains: Wait for 30 days before sending cold emails
- Older domains: 15-20 days should be enough
May take longer if:
Emails are still going to spam
Domain is new
Check the Readiness status on the WarmUp Report page. The status reflects the sender's recent warmup performance: an established domain with consistent warmup activity is typically Ready for Outreach in about 7–8 days, while a new domain must first reach 30 days old.
For what each status means and why it can change, see Outreach ready status explained.
Cold Email Volume During & After WarmUp
During WarmUp
Send 1 to 2 cold emails per day while the sender is still in WarmUp. (Optional)
After WarmUp Is Completed
Send up to 25 to 50 emails per sender depending on your reply rate:
- If you have a good reply rate (above 2%), you can go up to 50 per day
- Otherwise, start with 20 to 25 per day
Auto Ramp Up for Sender
Use Auto Ramp up for the sender (cold email sending) with these settings:
- Initial Daily Emails Limit: 5
- Daily Increment: 3
Note: Apply these sender settings only after WarmUp is completed.
Recommended Senders
| Rank | Provider |
|---|---|
| #1 | Google Workspace Gmail |
| #2 | Microsoft 365 Outlook |
Other email providers can be a hit or miss, but the best email deliverability can be expected from these two senders only.
Enable Email WarmUp
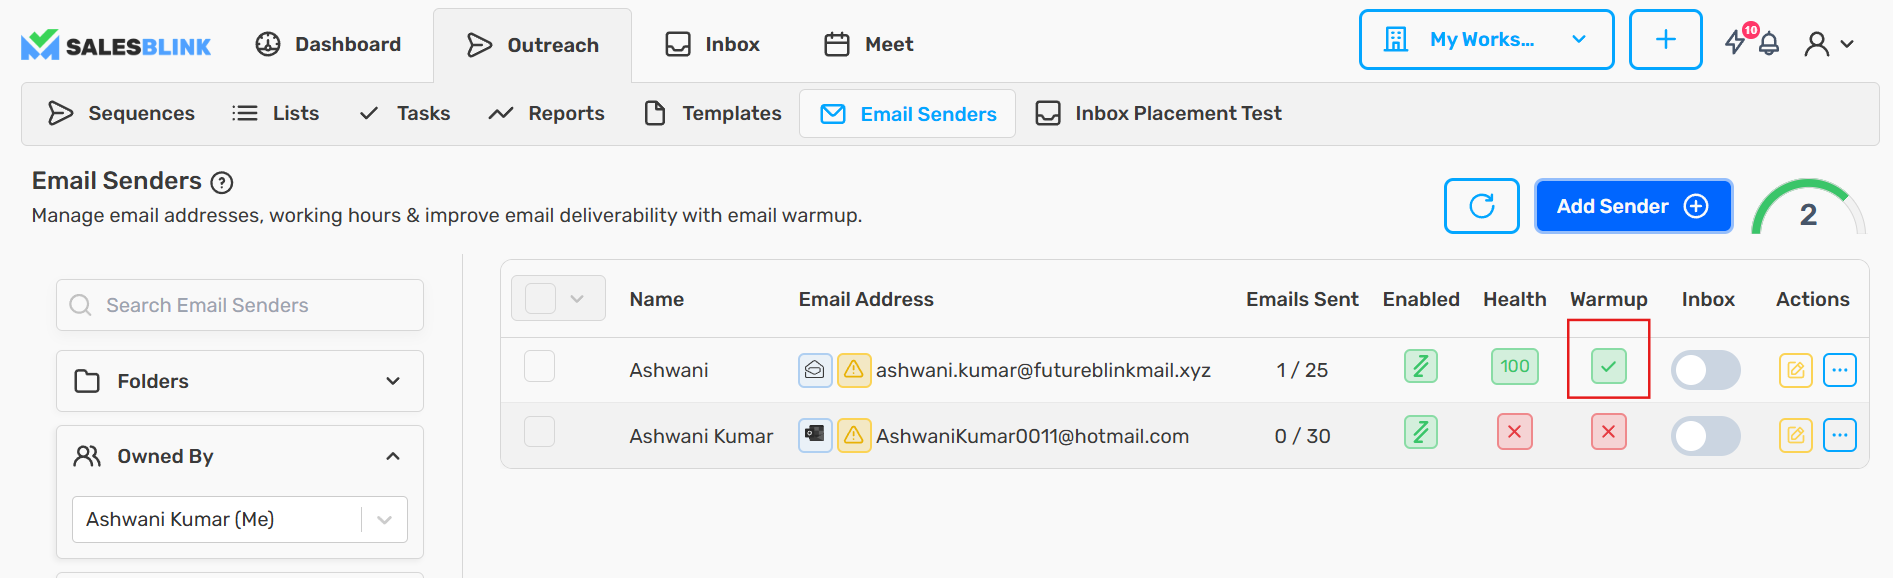
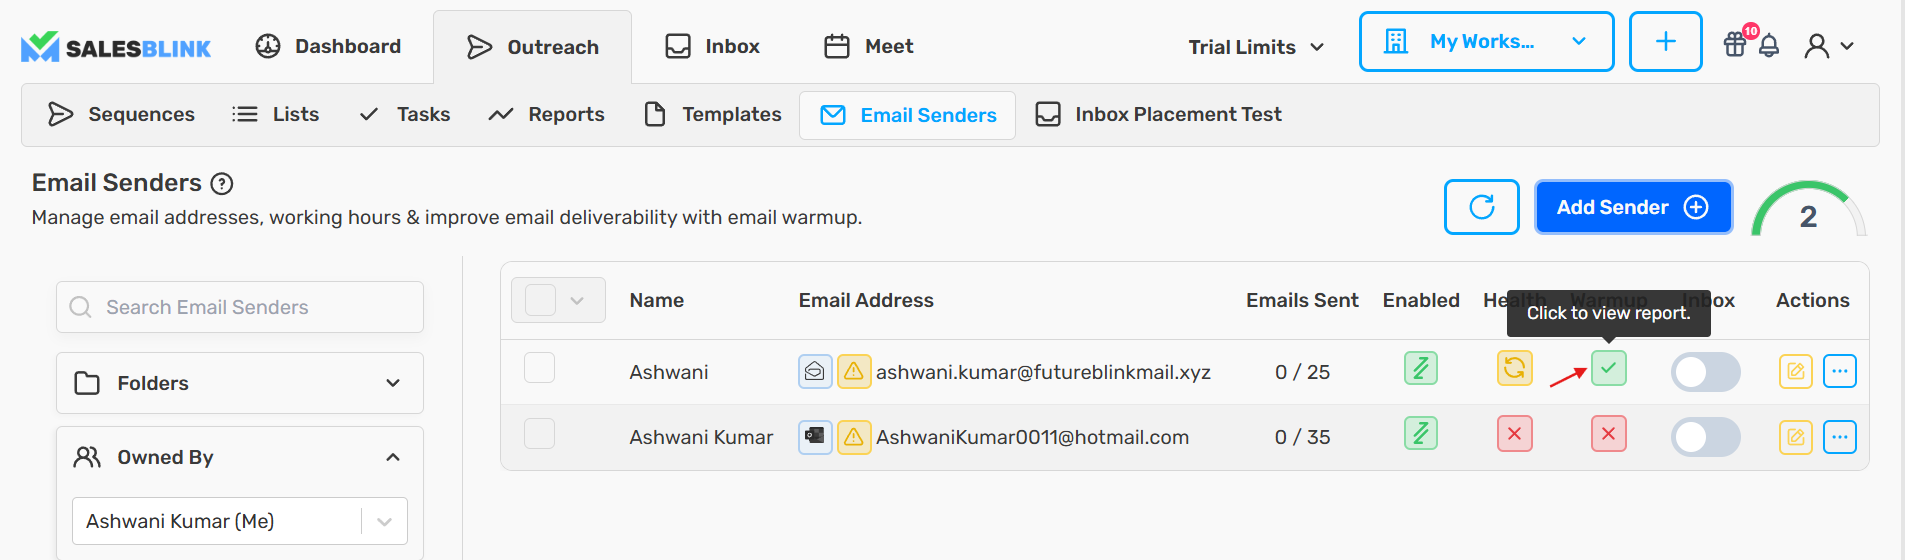
Email WarmUp is controlled from the Warmup column on the Email Senders page.
Go to Outreach → Email Senders
Find the Warmup column for your sender:
- Red ✕ icon → WarmUp is off. Click it to enable.
- Green ✓ icon → WarmUp is on. Click it to open the WarmUp Report.
- Grey ✕ (not clickable) → WarmUp is not available (e.g., SMTP-only accounts).
- The first time you enable WarmUp, a confirmation dialog appears:
- "🔥 Warming Up" explains how the pool works.
- Tick "Yes, I understand".
- Click Enable WarmUp.
Note: Email WarmUp is turned off by default when you connect a new sender. You can turn it on while connecting by ticking WarmUp this email address for better deliverability in the sender's settings step, or at any time later from the Warmup column.
Note: Enabling WarmUp is not the same as setting Max emails per day in the sender's settings. Max emails per day controls sequence (cold) emails only. Raising it does not start or speed up warmup. WarmUp starts only when you enable it in the Warmup column, and its volume is set by the Daily Warmup Limit below.
Tip: If some senders seem to be missing from the Email Senders page, set the owner filter to Owned by Anyone to show senders owned by every team member.
WarmUp Settings
All WarmUp configuration for a sender is done from a single WarmUp Settings modal. Open it once and configure everything below in one place.
Open the WarmUp Settings Modal
Go to Outreach → Email Senders
Click the green ✓ icon in the Warmup column to open the sender's WarmUp Report
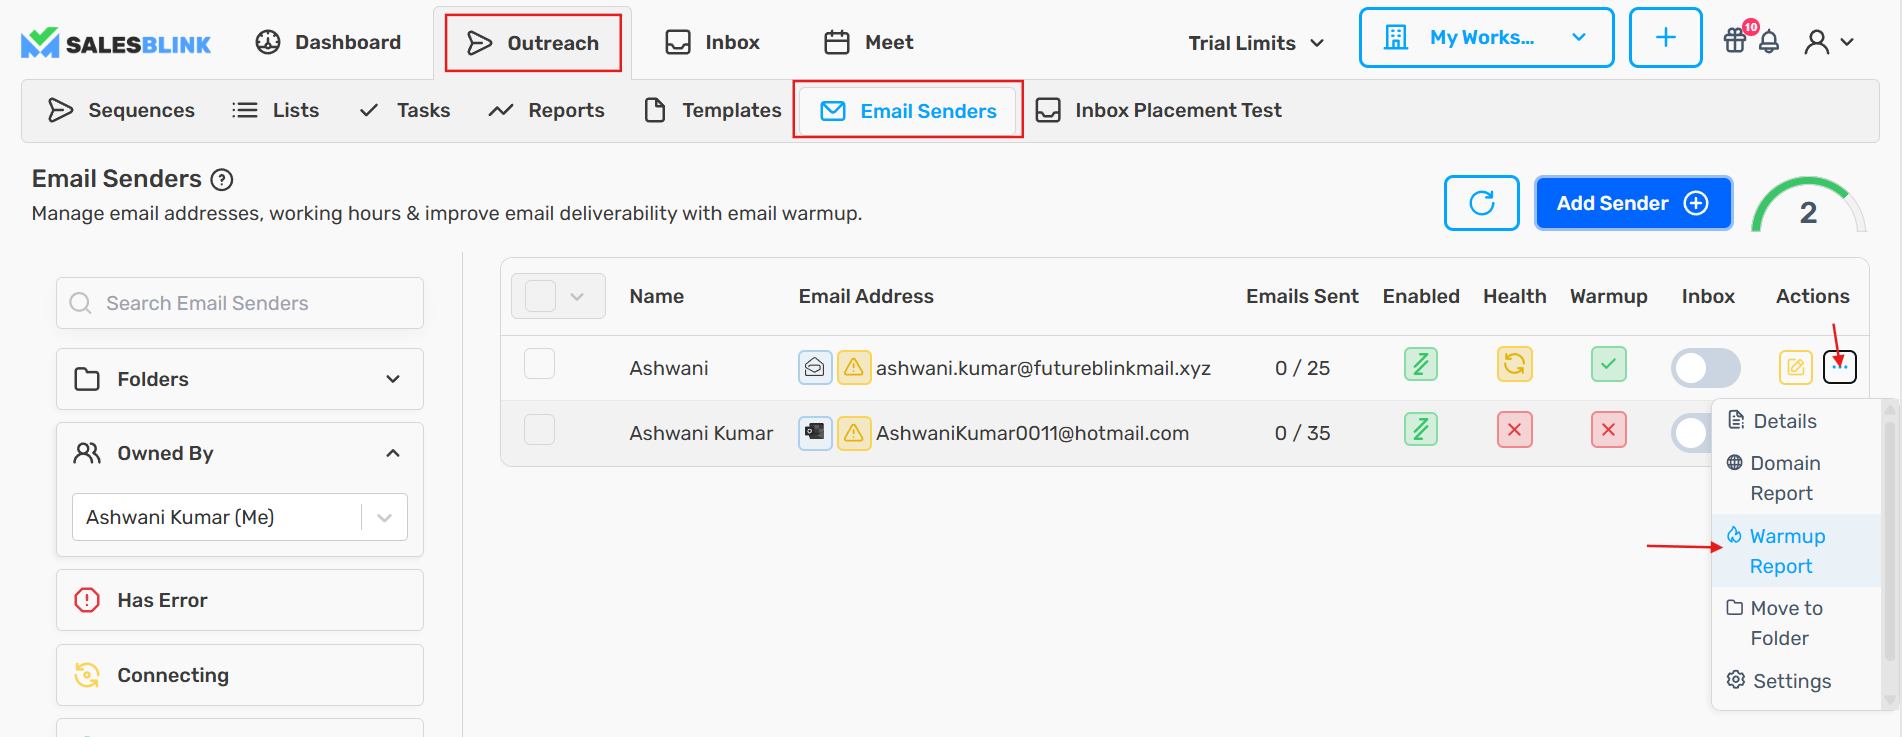
- On the WarmUp Report page, click the Settings button (gear icon)

This opens the WarmUp Settings modal ("Configure Email WarmUp settings for improved email deliverability."). Configure the fields below, then click Save.
Note: Daily frequency changes can take up to 24 hours to take effect.
Daily Warmup Limit
Field: Daily Warmup Limit (Max: 50)
The maximum number of WarmUp emails sent from your account per day. The default is 30. Recommended value: 30 to 50.
- 50 per day is a hard cap. You can't set a higher value.
- The reply rate is not configurable. Pool mailboxes reply to some of your warmup emails automatically.
- Actual sends can be higher than the limit. The limit counts new warmup emails. Replies to warmup emails in a conversation are sent on top of it, so your mailbox may send a few more warmup emails per day than the number you set.
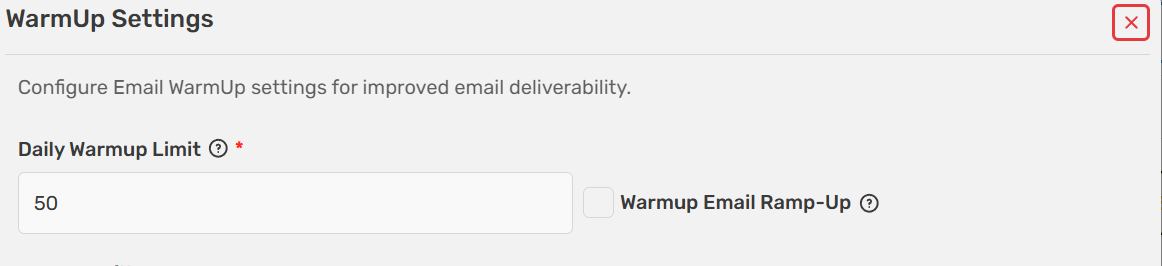
Warmup Email Ramp-Up (Auto Ramp Up)
Enable the Warmup Email Ramp-Up checkbox to automatically increase the daily email frequency over time instead of sending the full limit immediately. Then set:
Initial Daily Emails Limit — Starting daily WarmUp limit (must be less than the Daily Warmup Limit). The default is 5.
Daily Increment In Emails — By how much the frequency increases every day (must be less than the Daily Warmup Limit). The default is 1.
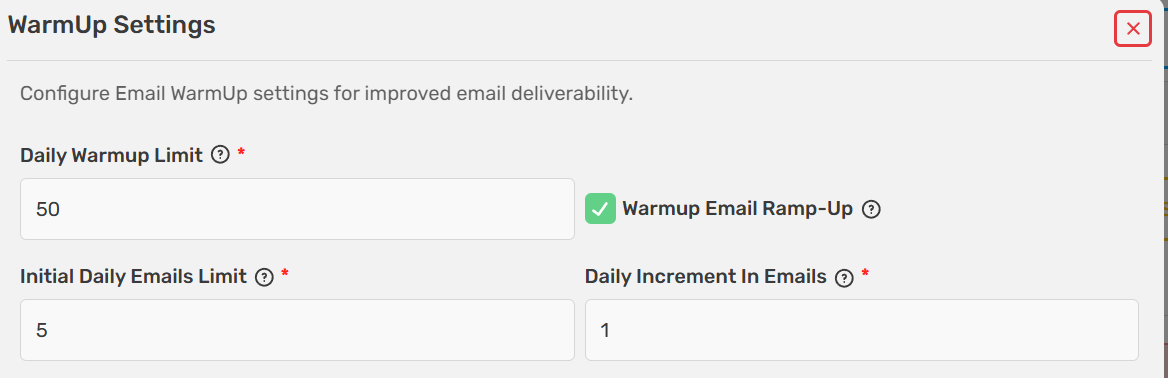
Notes: The Daily Warmup Limit acts as the maximum the ramp-up will reach. Ramp-up changes can take up to 48 hours to apply.
Warmup Filter Tag
The Warmup Filter Tag is a unique identifier that is included in the subject line of all warmup emails sent from your sender. It makes it easy to find, search, and filter warmup emails in your email client.
Every sender is automatically assigned a random tag made of two words joined by a hyphen (for example, friendship-fright). The tag is stored per sender, so each sender can have its own. You can replace it with your own custom tag.
Note: The old shared
hotblinktag is no longer used. If you still have a filter that matcheshotblink, it won't catch your warmup emails. Update the filter to use your sender's current Warmup Filter Tag.
Set or change the tag in the WarmUp Settings modal:
Find the Warmup Filter Tag field (two inputs: First Word and Second Word).
Type your own two words, or click the Randomize (↻) button to generate a random tag.
Click the Copy to clipboard button to copy the full tag for use in your email client filter.
Click Save.
Note: WarmUp-related updates take up to 24 hours to apply. After changing the tag, update your email client filter to use the new tag instead of the old one.
Why the Warmup Filter Tag is important
- Improved Deliverability: Some ESPs over time might detect a shared or common tag as a spam keyword and negatively impact your email sender's reputation. Using a unique custom filter tag improves the impact of WarmUp on your email sender.
- Keeps your inbox organized: Warmup emails are generated automatically, so they can quickly clutter your inbox. A dedicated tag lets you filter them into a separate folder or label.
- Prevents confusion: A unique tag helps you avoid mistaking warmup emails for real prospect replies or important conversations.
- Enables accurate filtering: Email providers like Gmail and Outlook let you create rules based on words in the subject line. Using a custom tag makes these rules precise and reliable.
- Per-sender control: Each email sender has its own tag, but we recommend you keep the same tag for all your senders so you can automatically update them and create the right filters as well.
Create a Filter in Your Email Client
Warmup emails are generated automatically and can quickly clutter your inbox. Create a filter (rule) in your email client to automatically hide them or organize them into a separate folder/label.
The filter must include the Warmup Filter Tag you set for your email sender's WarmUp. Every warmup email contains this tag in its subject line, so the filter works only when it matches on this exact tag. If the tag is missing or does not match the one configured for your sender, the filter will not catch your warmup emails.
How it works:
Every warmup email contains your Warmup Filter Tag in the subject line (e.g.,
friendship-fright).Your email client filter matches emails whose Subject contains this tag.
Matched emails are then skipped from the inbox, moved to a folder, or labeled.
Steps:
Copy the exact Warmup Filter Tag configured for your sender.
In your email client, create a new filter or rule.
Set the condition to Subject contains → your Warmup Filter Tag (e.g.,
friendship-fright).Choose an action such as Skip Inbox, Apply label/folder, or Mark as read.
Save the filter and, when prompted, apply it to existing warmup emails.
Filter steps by email client
Use your exact Warmup Filter Tag (for example, friendship-fright) in each of these. Menu names can differ slightly between versions.
Gmail and Google Workspace
- In Gmail, click the Show search options icon in the search bar.
- In Subject, enter your Warmup Filter Tag.
- Click Create filter.
- Tick Skip the Inbox (Archive it) and Apply the label, then choose or create a label such as
Warmup. - Tick Also apply filter to matching conversations and click Create filter.
Outlook and Microsoft 365
- Go to Settings → Mail → Rules and click Add new rule.
- Name the rule, for example
Warmup. - Add the condition Subject includes and enter your Warmup Filter Tag.
- Add the action Move to and choose a folder such as
Warmup. - Click Save.
Apple Mail
- Go to Mail → Settings → Rules and click Add Rule, then name the rule, for example
Warmup. - Set the condition to Subject contains your Warmup Filter Tag.
- Set the action to Move Message to a mailbox such as
Warmup. - Click OK, then choose whether to apply the rule to existing messages.
Hostinger Mail (webmail)
- Sign in to Hostinger Webmail, click the Settings (⚙️) icon, and select All settings → Filters.
- Click Create filter and enter a filter name, for example
Warmup. - Select Subject, the condition contains, and enter your Warmup Filter Tag.
- Under Then, select Move message to and choose a folder such as
Warmup. - Make sure Enable filter is on, then click Save.
Roundcube and other webmail
- Open Settings → Filters and create a new filter.
- Set the rule to Subject contains your Warmup Filter Tag.
- Set the action to Move message to a folder such as
Warmup. - Save the filter.
Official guides:
- Create rules to filter your emails in Gmail
- Manage email messages by using rules in Outlook
- Use rules to manage emails you receive in Mail on Mac
- How to set up email filters on Hostinger Mail
- Creating filters in Zoho Mail
Similar features are available in almost any email client.
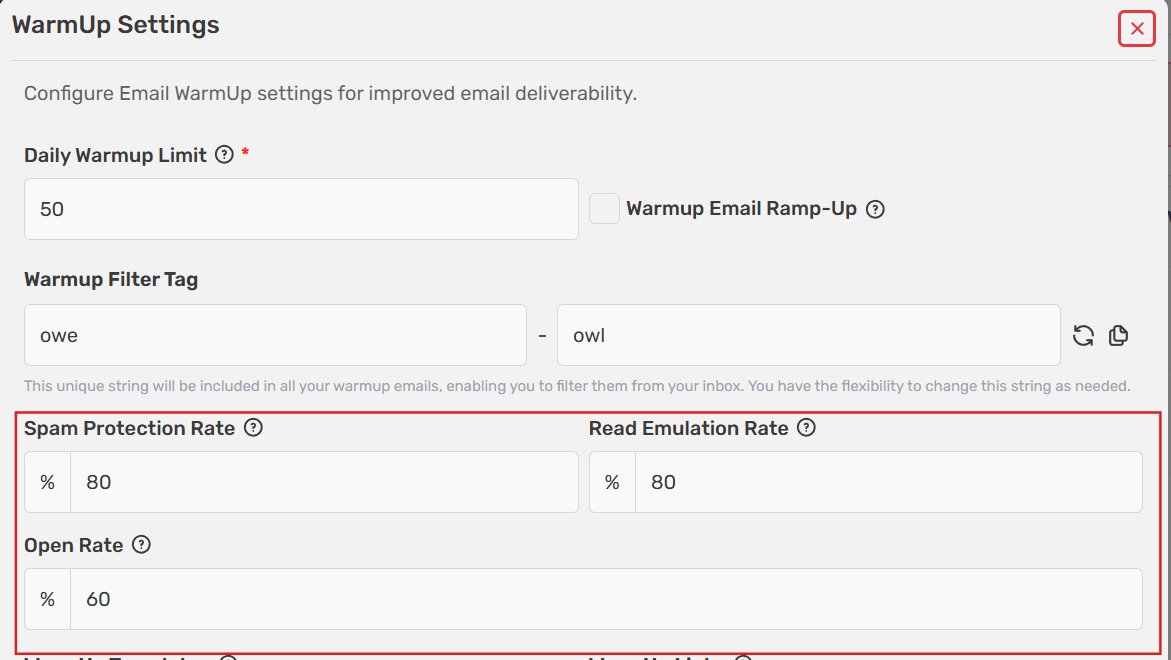
Open, Spam Protection & Read Emulation Rates
These three percentage fields let you fine-tune how WarmUp emulates human engagement. The defaults work well for most senders.
| Field | What it controls | Default |
|---|---|---|
| Spam Protection Rate | Percentage of your warmup emails to save from the spam folder | 80% |
| Read Emulation Rate | Percentage of your warmup emails where time is spent scrolling to emulate human reading | 80% |
| Open Rate | Percentage of your warmup emails to open | 60% |
Note: Modify these only if you understand the impact.
WarmUp Templates
WarmUp the real templates you plan to use in campaigns for better deliverability.
Note: WarmUp Templates and WarmUp Links are available on the Growth and Business plans (and the matching Agency plans), not on Starter.
First, create the email template(s) you want to warm up.
In the WarmUp Settings modal, find the WarmUp Templates field.
- Select one or more templates.
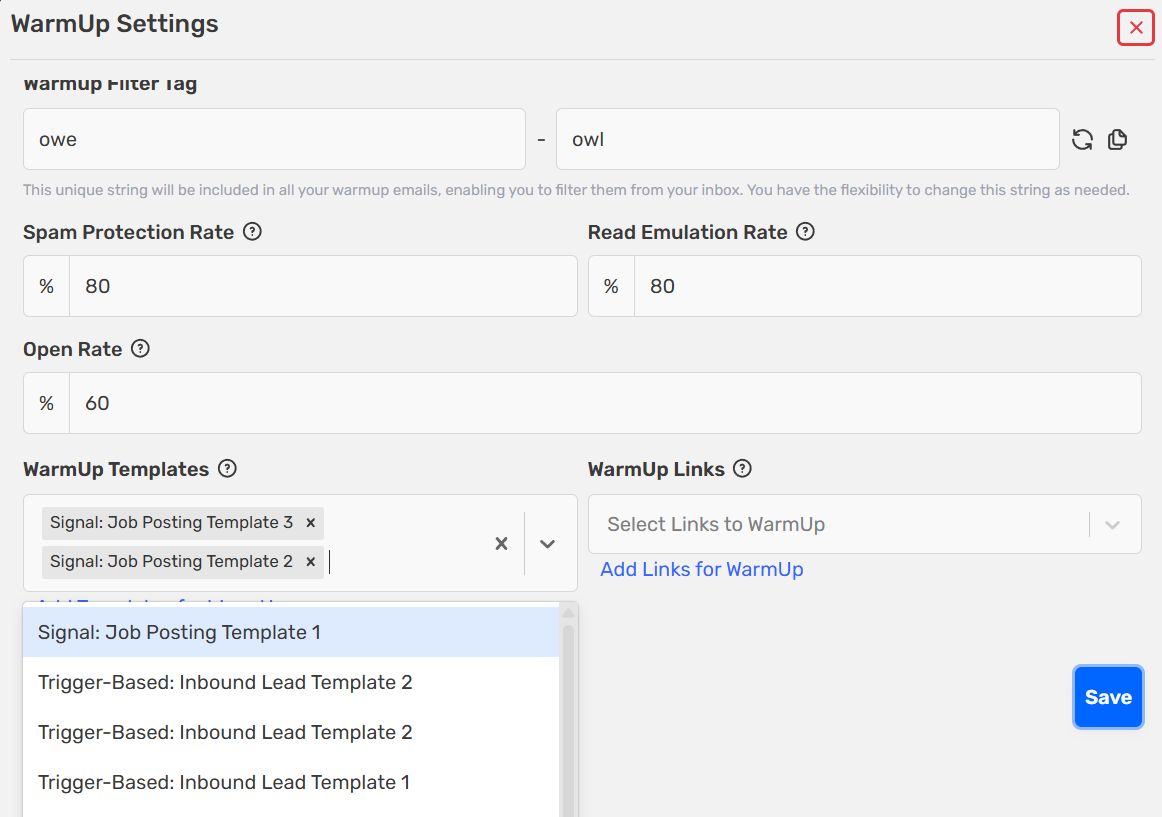
- Click Save.
Notes: Multiple templates are supported. Spintax and variables are not replaced during warmup.
WarmUp Links
In the WarmUp Settings modal, the WarmUp Links field lets you select the website links to include in warmup emails so your future cold emails with those links don't land in spam.
To select links here, they must be created first. See Add & Assign WarmUp Links below.
Add & Assign WarmUp Links
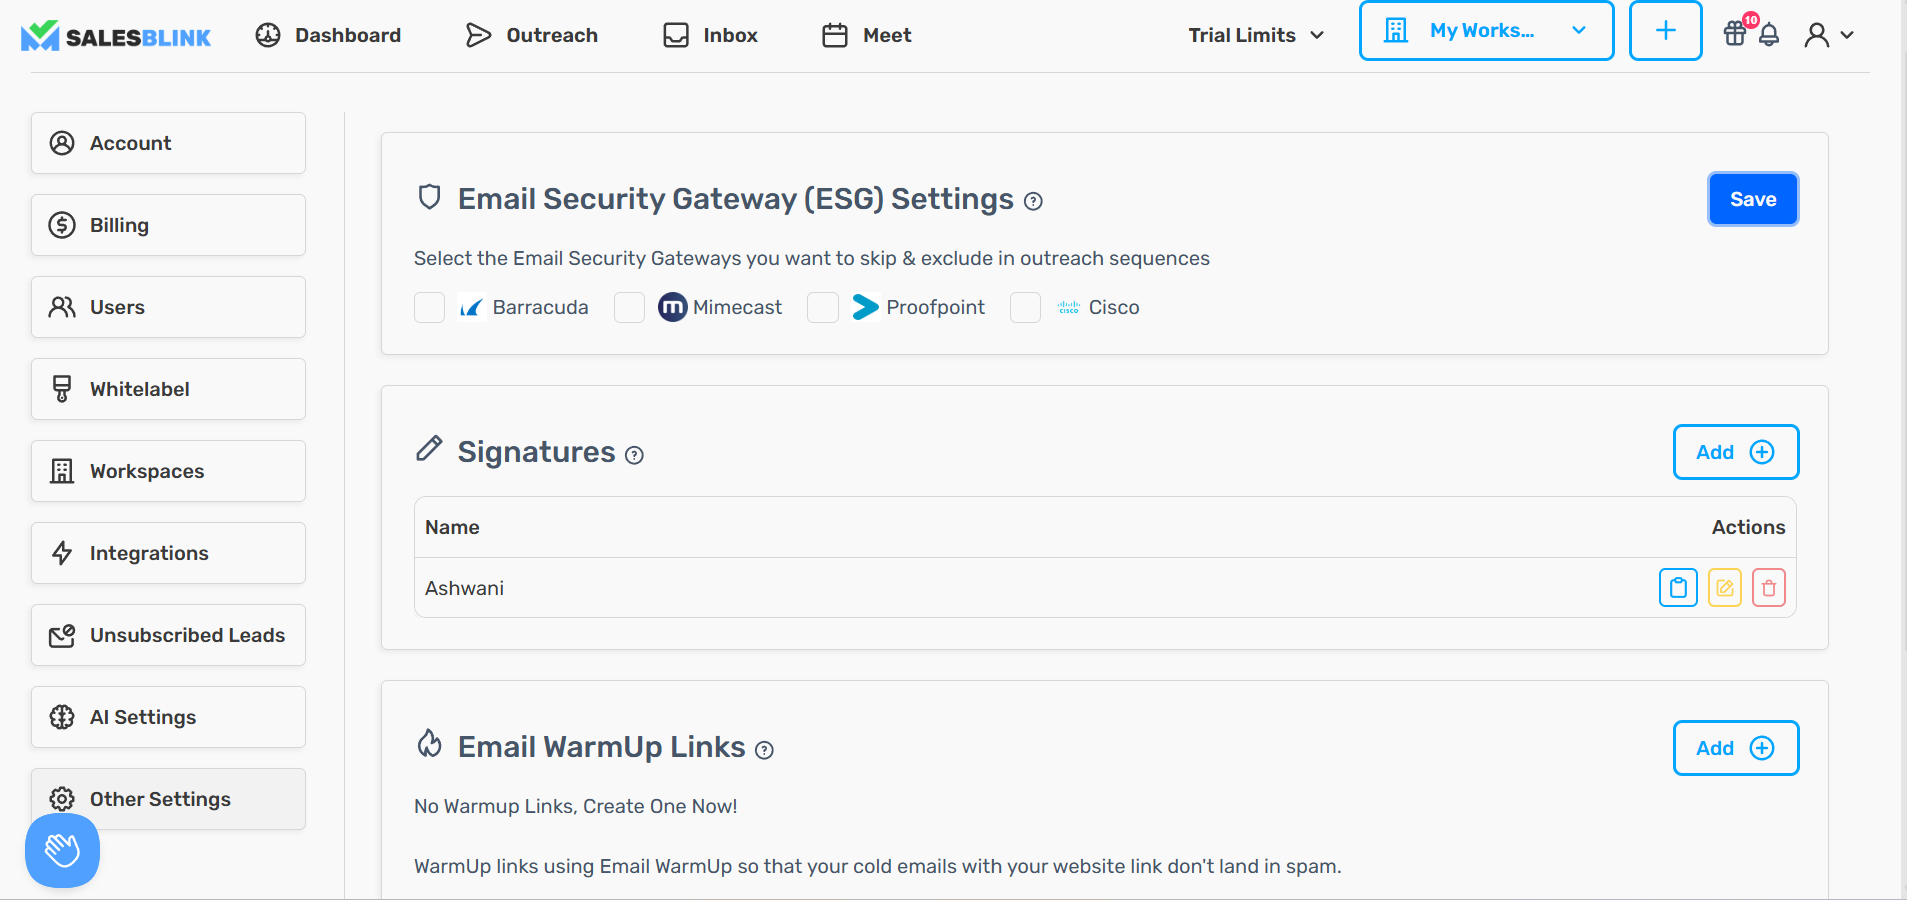
WarmUp Links make your links look natural and trusted to email providers. Links are created on the Other Settings page, then assigned to a sender in the WarmUp Settings modal.
Step 1: Go to Other Settings
- Click your Profile icon (top right)
- Select Other Settings

Step 2: Add a WarmUp Link
- Scroll to the Email WarmUp Links card
- Click Add
Step 3: Fill Link Details
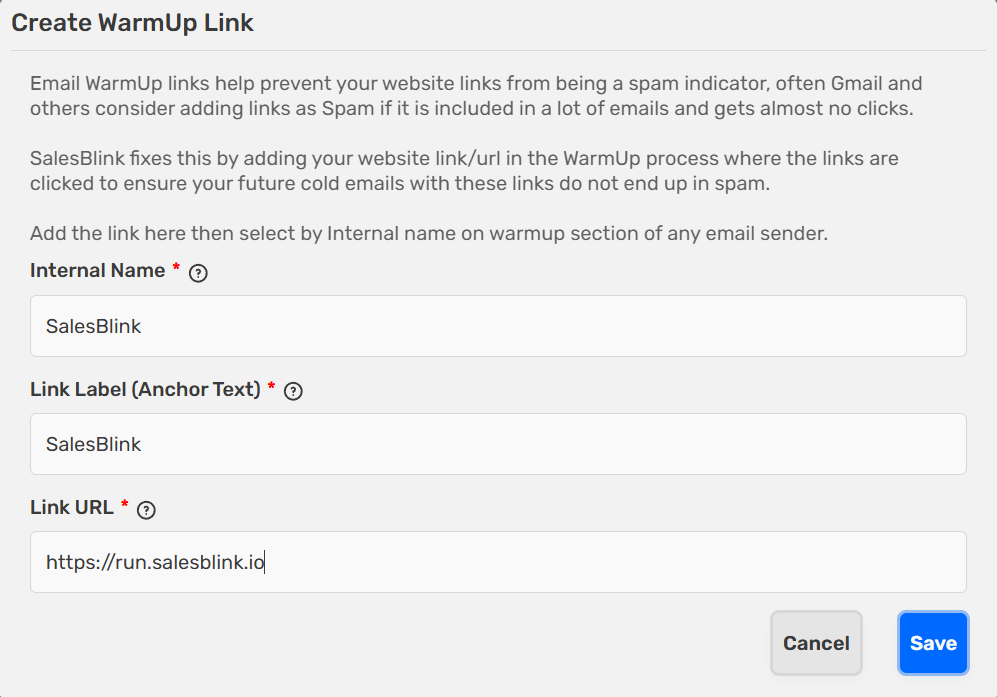
Complete the Create WarmUp Link (or Edit WarmUp Link) popup:
Internal Name — Used inside SalesBlink for identification (e.g., "SalesBlink")
Link Label (Anchor Text) — Text that appears in the email (e.g., "SalesBlink")
Link URL — The actual website link (e.g., "https://run.salesblink.io/")
Step 4: Save Link
- Click Save
Your link will now appear in the Email WarmUp Links list.
Step 5: Assign the Link to a Sender
Go to Outreach → Email Senders
Open the sender's WarmUp Report (green ✓ icon)
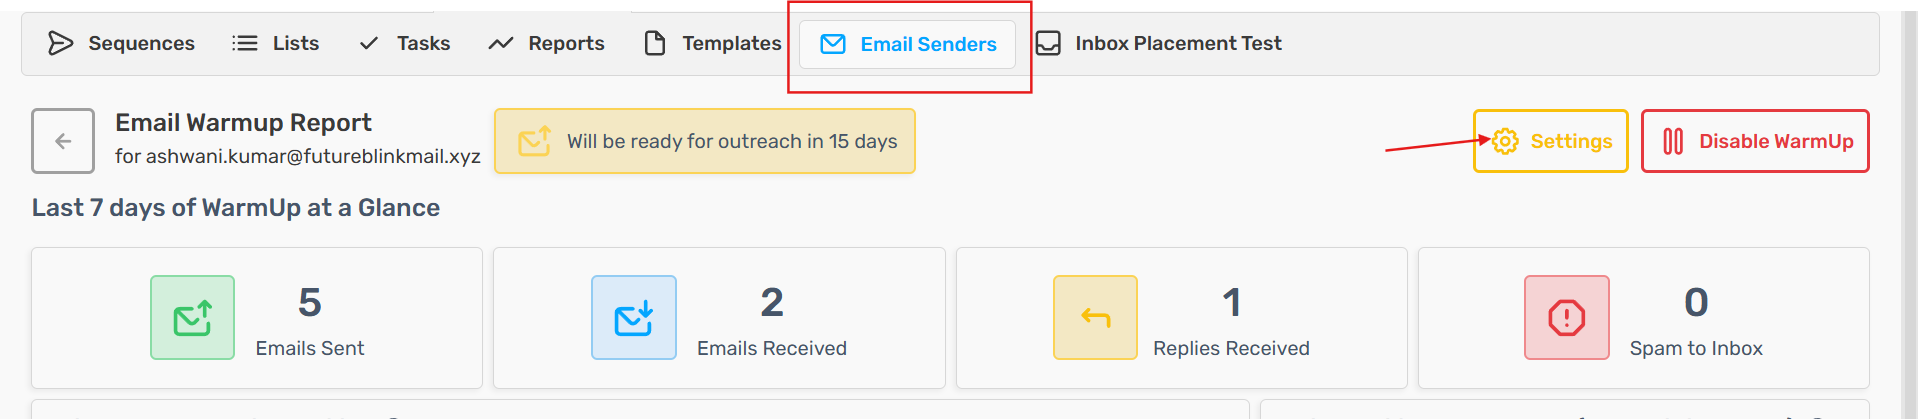
Click Settings
In the WarmUp Links field, select the link you created (e.g., "SalesBlink")
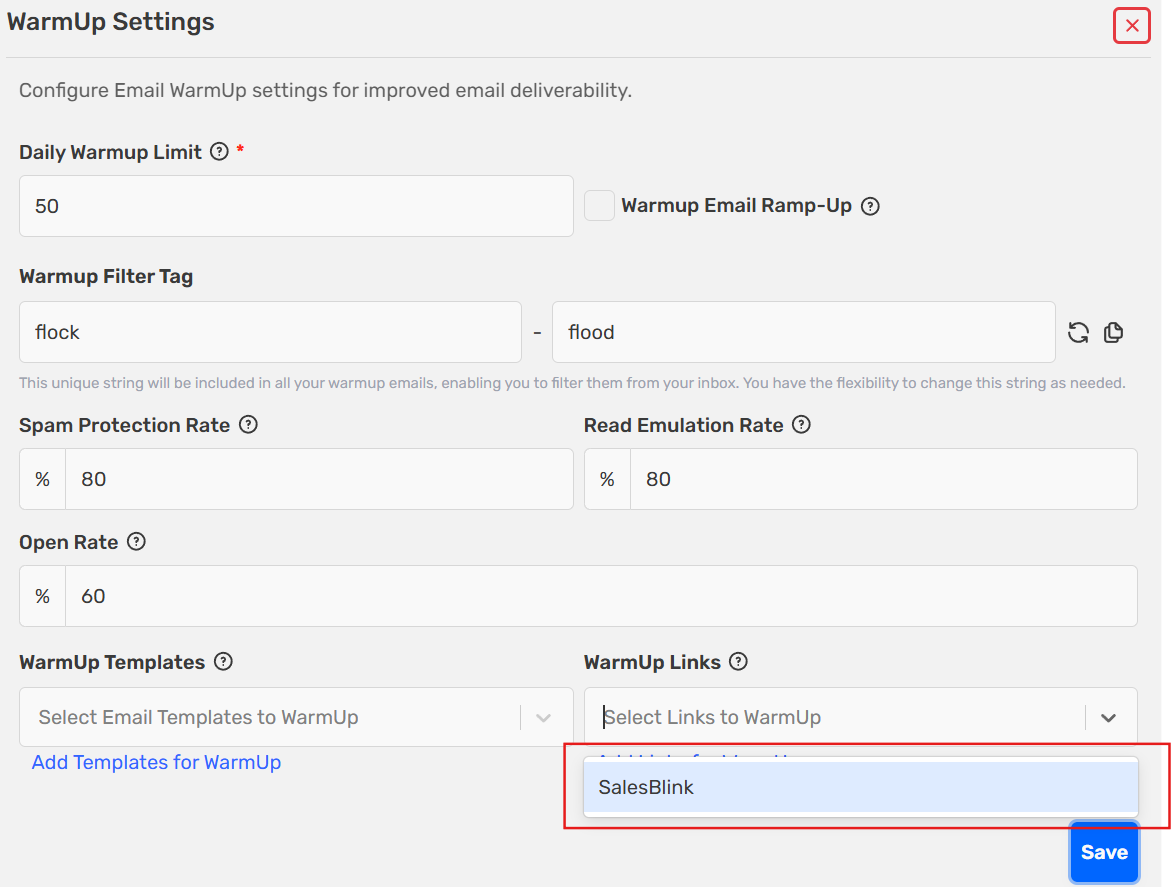
- Click Save
Links are assigned per sender. To assign links to several senders at once, select the senders on Outreach → Email Senders, click the down arrow on the multi-select checkbox, and open WarmUp Settings.
Understanding the WarmUp Report
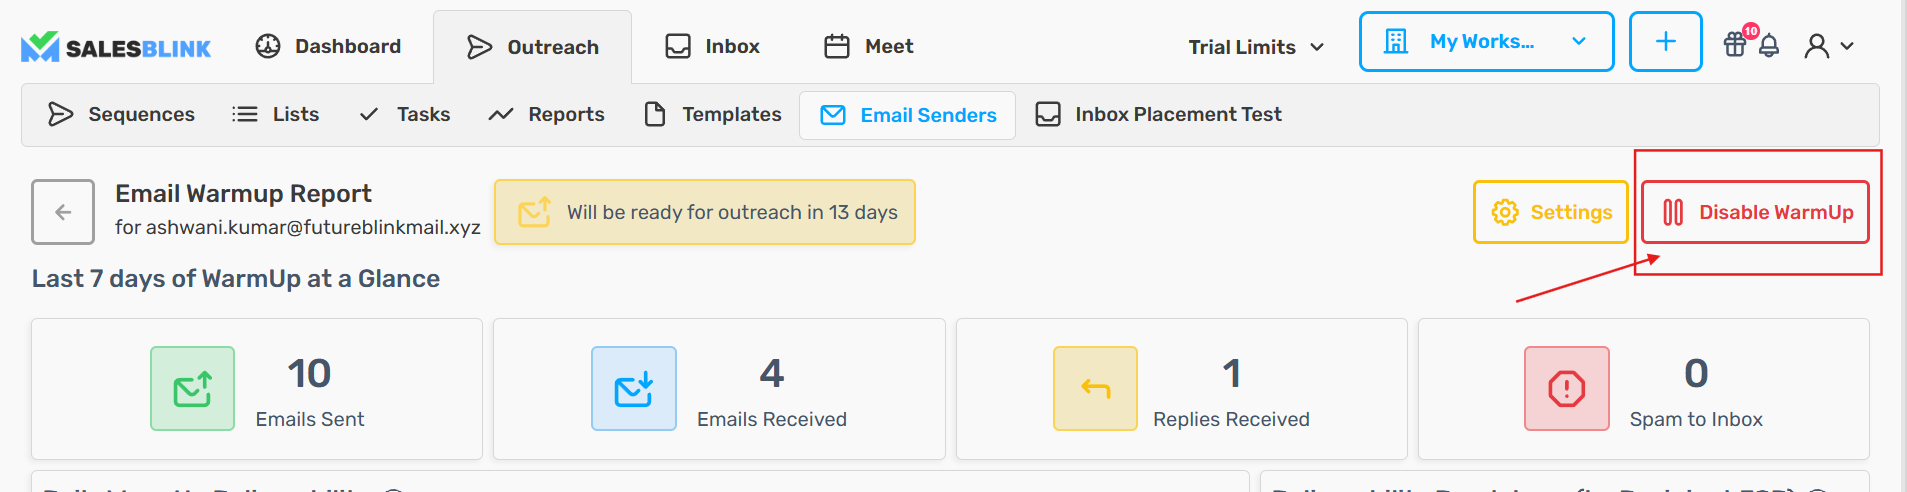
Open a sender's report by clicking the green ✓ icon in the Warmup column on the Email Senders page. The report shows the page title "Email Warmup Report".
Readiness Status
At the top of the report, a banner shows the sender's current readiness:
- "Will be ready for outreach in N days" — an exact calendar wait, such as a new domain reaching 30 days old.
- "Will be ready for outreach in ~N days" — the
~means an estimate that assumes the sender keeps following its schedule and no new spam placements occur. - "Warming up - needs more warmup sends", "Warmup Paused - enable sending & receiving", or "Waiting for warmup email - check connection" — the sender is not ready yet, and the label tells you why.
- "Warmup Not Active" — WarmUp is not turned on for the sender.
- "Ready for Outreach" — recent warmup activity is healthy enough for outreach.
Once you have seen "Ready for Outreach" for a sender, the readiness banner is no longer shown for that sender.
Q: Why does it say "not ready" when everything looks good?
Readiness checks spam placement per email provider (Google, Microsoft, and others are each evaluated separately), not just your overall spam rate. So if one provider filters a small share of your warmup mail to spam, the status can stay "not ready" even when your overall spam rate is low, your domain report is clean, and your domain is well over 30 days old. In this case:
- Your sender health still shows 85–90. Your deliverability is fine.
- The estimate counts down until those placements age out of the rolling window or are diluted by new clean sends, so it typically clears on its own within days.
- No action is needed unless the WarmUp Report stays in this state for more than a couple of weeks. Then check the Deliverability Breakdown to see which provider is filtering you and review your email content and domain setup for that provider.
Note: WarmUp may take longer for new domains.
For every status label, what it means, and why it can change, see Outreach ready status explained.
From here you can click Settings (to configure) or Disable WarmUp.
Last 7 Days of WarmUp at a Glance
Track these performance metrics for the last 7 days:
Emails Sent — Sent from your sender to the WarmUp pool
Emails Received — Received from the WarmUp pool
Replies Received — Shows engagement → improves trust
Spam to Inbox — Emails moved from spam to inbox (key metric for deliverability)
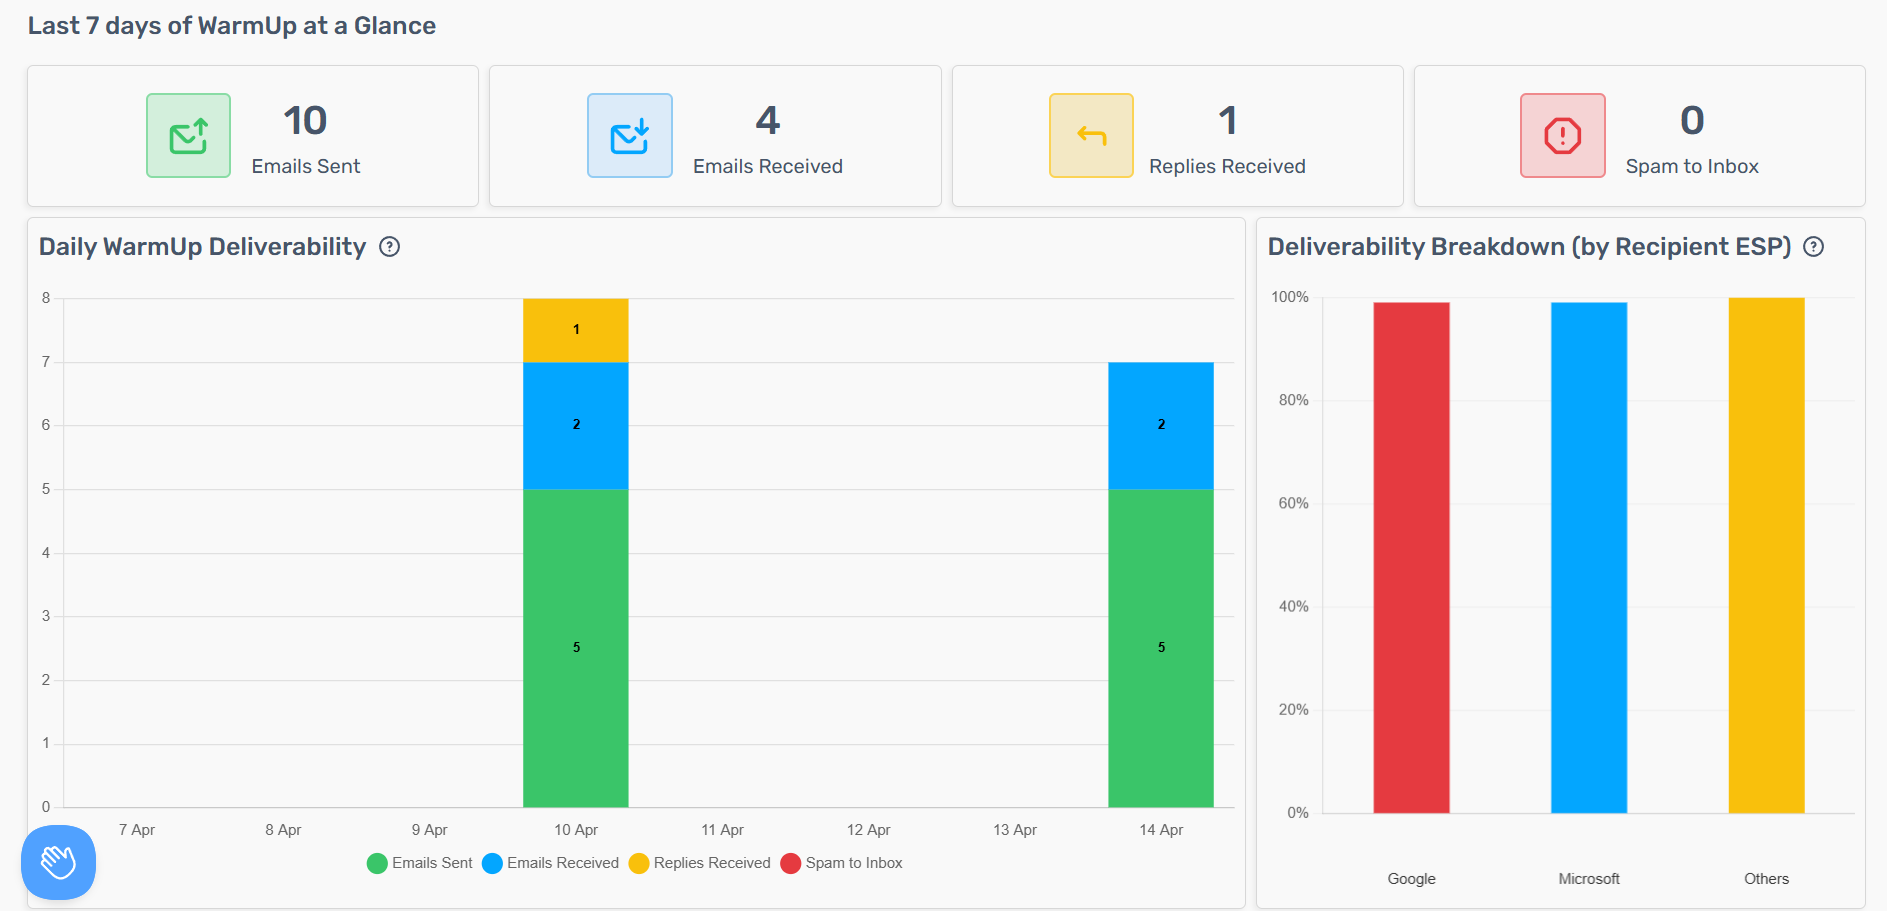
Daily WarmUp Deliverability Chart
A bar chart shows your overall daily warmup activity and deliverability over time (Emails Sent, Emails Received, Replies Received, Spam to Inbox).
Deliverability Breakdown (by Recipient ESP)
The Deliverability Breakdown chart shows how your warmup emails are performing across major recipient Email Service Providers (ESPs): Google, Microsoft (Outlook), and Others.
It measures the percentage of warmup emails sent from your sender that landed directly in the recipient's inbox for each ESP. A higher percentage means better inbox placement and deliverability for that provider.
This breakdown helps you identify which email providers are accepting your emails well and which ones may need additional attention.
Disable Email WarmUp
Go to Outreach → Email Senders
Open the sender's WarmUp Report (green ✓ icon)
Click Disable WarmUp
Warning: Disabling may reduce deliverability and increase spam risk.
Frequently Asked Questions
Q: What time zone does WarmUp use?
By default, WarmUp sends throughout the day, every day, independent of your sequence sending hours. If you turn on Send WarmUp Emails Only On Selected Days & Times, WarmUp uses the timezone you pick there.
Q: Can I set sending hours for warmup emails?
Yes. In the WarmUp Settings modal, tick Send WarmUp Emails Only On Selected Days & Times, then choose a Timezone, the days, and up to 4 time slots per day. No warmup emails or replies are sent outside these windows, and your daily warmup limit is spread evenly across the hours you select.
Q: I set Max emails per day to 100. Why hasn't warmup started?
Max emails per day only applies to sequence emails. Enable WarmUp from the Warmup column on Outreach → Email Senders, and set its volume with Daily Warmup Limit (max 50).
Q: Why are there emails in my Sent folder that I didn't write?
Those are warmup emails. They are sent from your mailbox on purpose. Filter them with your Warmup Filter Tag.
Q: Why do my warmup emails show {{first_name}} or spintax?
Variables and spintax are not replaced in warmup emails. This is harmless and doesn't affect warmup.
Q: Should I turn off WarmUp when my campaign starts?
No. Keep WarmUp running during campaigns.
Q: Why is WarmUp not available for my sender?
Not available for SMTP-only email accounts, and it requires both Sending and Receiving to be enabled.
Results
Email WarmUp helps you:
Build sender reputation
Reduce spam placement
Improve inbox rate
Boost campaign performance