Note: Do not order DFY on your main website domain.
Overview
Purchase Outlook mailboxes directly from SalesBlink with done-for-you technical setup. SalesBlink handles DNS configuration, SPF, DKIM, DMARC, and domain redirection automatically.
Prerequisites
Before you start, confirm you have the following:
- Payment method: A credit or debit card for the purchase.
Note: Domains are priced per year and mailboxes are priced per month.
Quick Start: You can directly go to this link to start placing your order: https://run.salesblink.io/outreach/email-senders?addsenders=true
Why Use a New Burner Domain?
Using a dedicated burner domain for cold email outreach is critical for protecting your primary business domain's email reputation. Outreach activity can affect domain reputation, and if a domain gets flagged or blacklisted, your main domain remains unaffected. This separation ensures your primary website, branded emails, and transactional messages continue to land in inboxes while your outreach operates independently. A fresh burner domain also starts with a clean reputation, giving you the best chance for high deliverability from day one.
Important Notes
- As we advise, you never use your main domain for cold email. Hence, either you should use a burner domain that you have purchased yourself or get it directly from us.
- We recommend using .com domains only, as it builds trust.
- These mailboxes currently are only available for use with SalesBlink for cold email outreach.
- You do not get webmail or Microsoft 365 admin access by default. You can see all replies and activity in SalesBlink, except warm-up activity, which is hidden in the SalesBlink inbox by default. If you need to log in to a mailbox, an app password is available on request through support.
- DFY mailboxes and domains are non-refundable. See Billing, Plans, Credits and Refunds.
Before you order
Most DFY problems start before checkout. Check these points first, especially if you are connecting a domain you already own.
- Do not use your main or live website domain. Pointing its nameservers to SalesBlink affects your website and your regular email. Use a separate burner domain.
- Your registrar must allow nameserver changes. Connecting an existing domain requires you to point its nameservers to SalesBlink. Cloudflare Registrar does not allow this. If your domain is registered with Cloudflare, your options are:
- Buy a new burner domain from SalesBlink in the same order flow.
- Use a domain registered with another registrar that allows nameserver changes.
- If you already placed the order, ask support to cancel it for account credit.
- Never paste a Cloudflare Global API Key in chat. If support needs access to your Cloudflare DNS, create a scoped API token limited to the zone (Edit zone DNS, plus Page Rules or Dynamic Redirects if a redirect is needed) and share only that token.
- Remove extra nameservers. Keep only the nameservers SalesBlink gives you. Delete any others, for example
*.nsone.netentries. - Remove the old setup. If the domain already has a Microsoft 365 tenant or subscription, remove the existing email service and cancel that subscription. Delete old DNS records before you order.
Path A: Buy a New Domain with Outlook Mailboxes
Step 1: Navigate to Email Senders
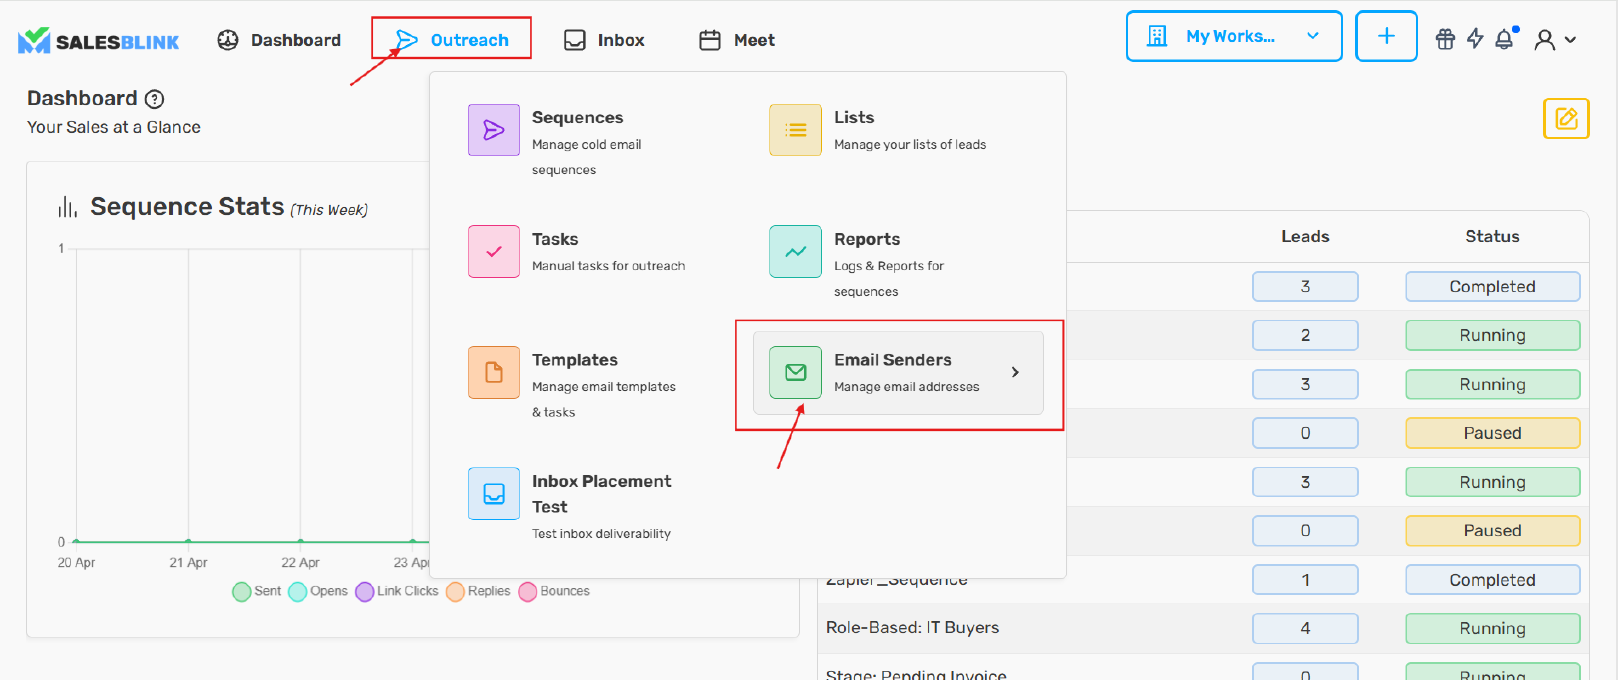
From the SalesBlink dashboard, click the Outreach tab in the Top Navbar.
- Locate the Email Senders card and click it.
Step 2: Add a New Sender
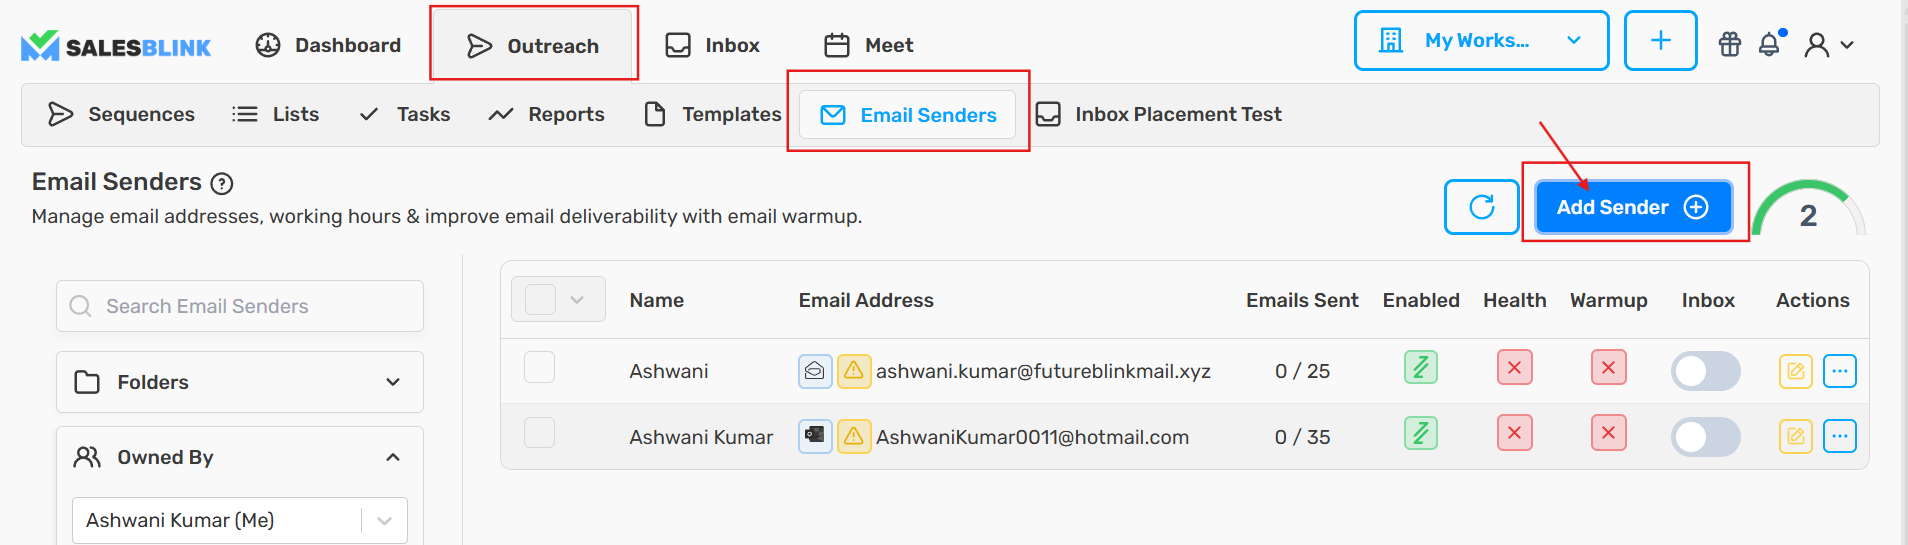
On the Email Senders page, click the Add Sender button in the top-right corner.
Step 3: Select Outlook (Office 365) Accounts
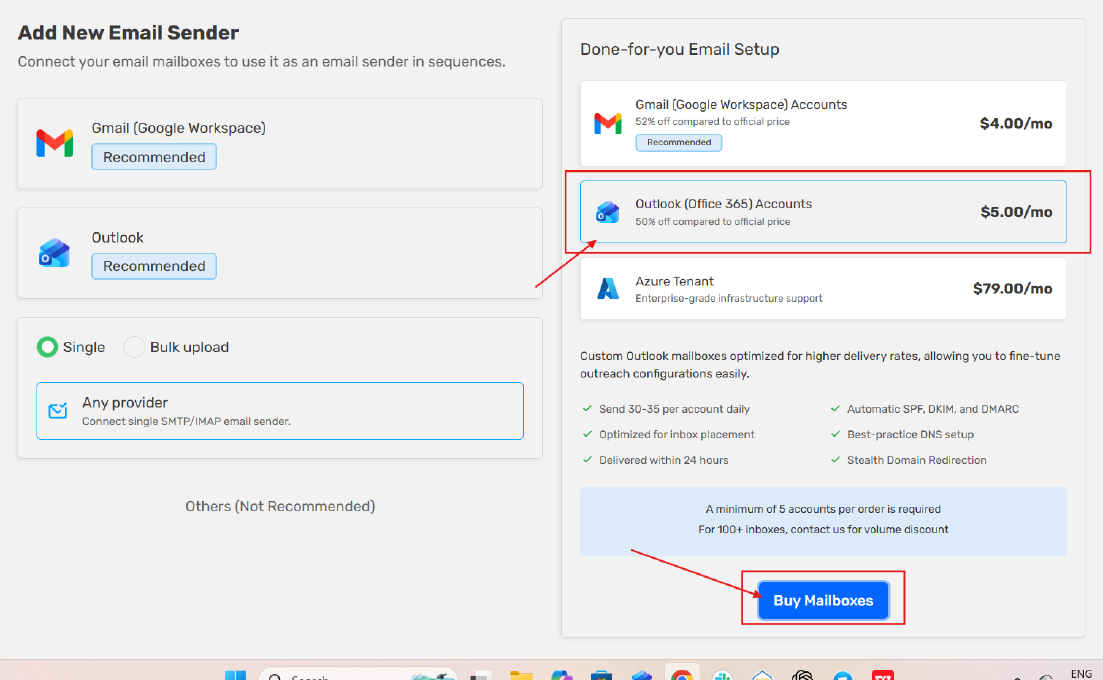
The Add New Email Sender page displays done-for-you email setup options.
- Locate the Outlook (Office 365) Accounts card on the right panel.
- Review the features: Send 30-35 per account daily, Optimized for inbox placement, Delivered generally within 3 hours, Automatic SPF, DKIM, and DMARC, Best-practice DNS setup, Stealth Domain Redirection.
- Click the Buy Mailboxes button.
Note: A minimum of 1 mailbox per order is required. For 100+ inboxes, contact SalesBlink.
Step 4: Choose Buy New Domain
The Done-For-You Outlook Setup page opens. Two tabs are available at the top.
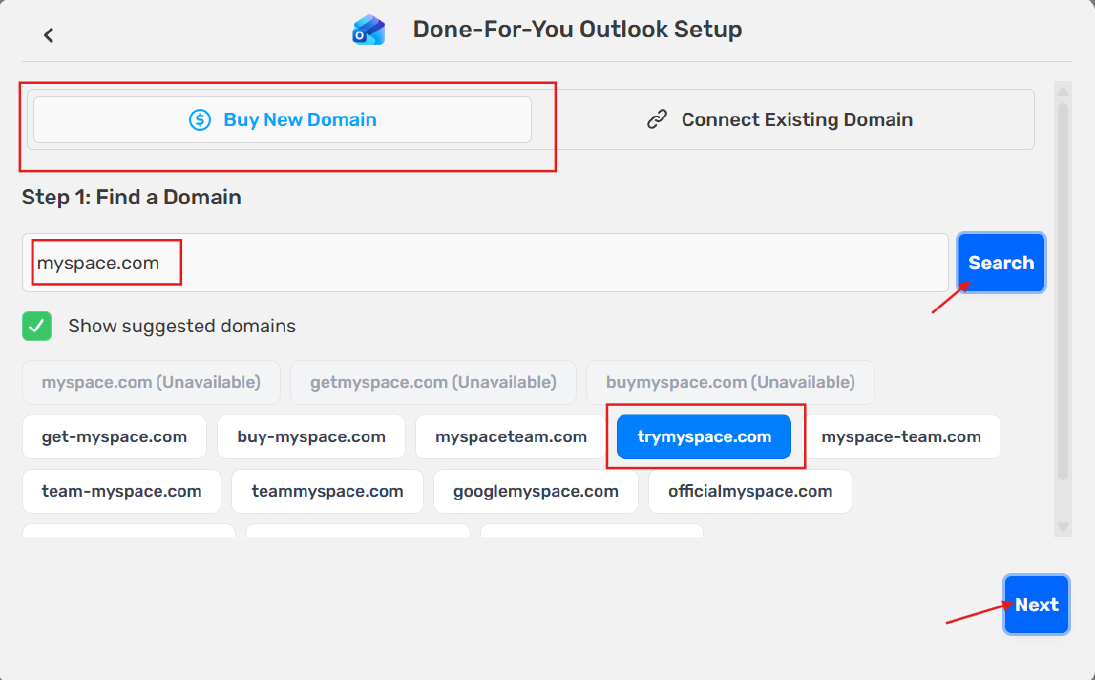
- Click the Buy New Domain tab.
Step 5: Find and Select a Domain
Under Step 1: Find a Domain, enter your desired domain name in the search field.
- Type a domain name (for example, myspace.com).
- Click the Search button.
- The page shows availability results. Unavailable domains are grayed out.
- Click an available domain from the suggestions list to select it.
- Click Next to continue.
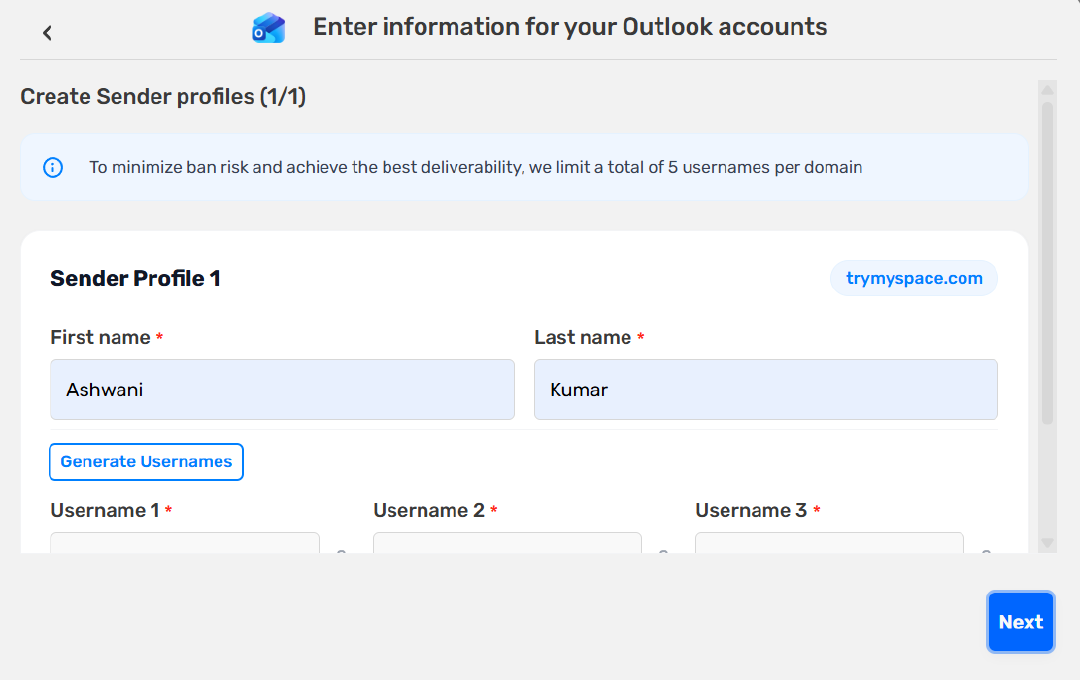
Step 6: Create Sender Profiles
The Enter information for your Outlook accounts page opens.
- An info banner states: To minimize ban risk and achieve the best deliverability, we limit a total of 5 usernames per domain.
- Enter a First name and Last name for the sender profile.
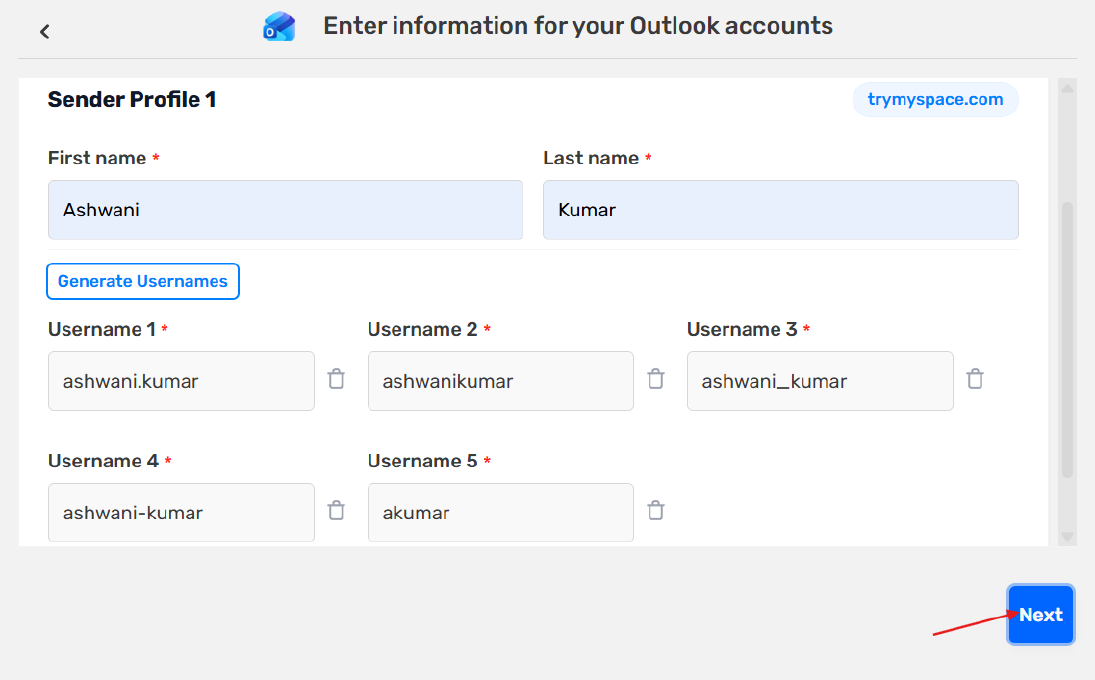
- Click Generate Usernames. SalesBlink auto-creates 5 username variations.
- Review the generated usernames. Click the trash icon next to any username you want to remove.
- Click Next to proceed.
Step 7: Set Domain Redirection
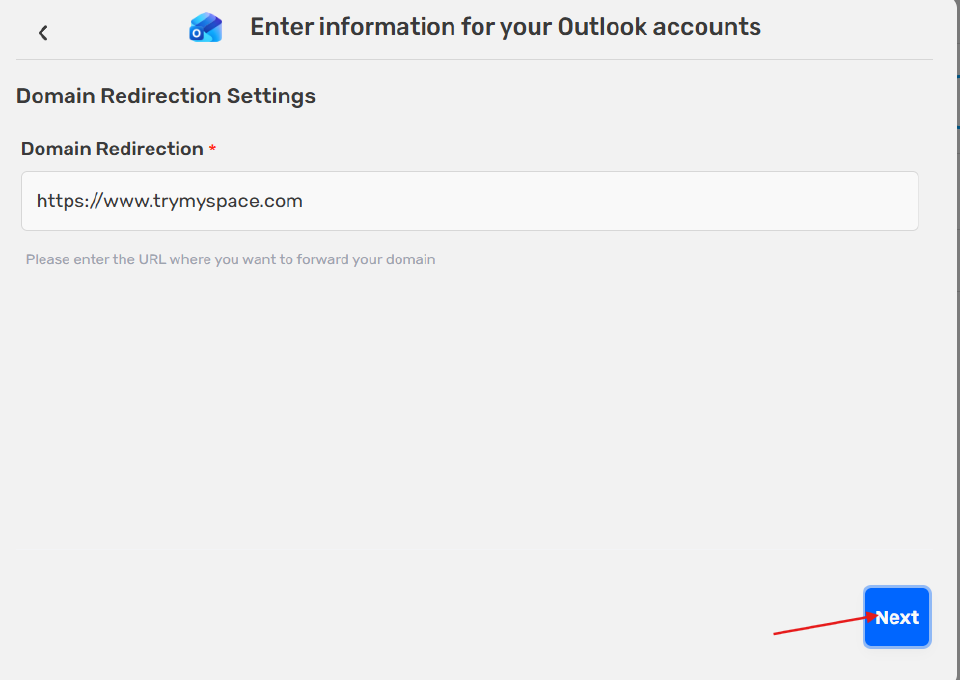
The Domain Redirection Settings page appears.
- Enter the URL where you want to forward your domain (for example, https://www.trymyspace.com).
- Click Next to proceed.
Step 8: Review Order and Pay
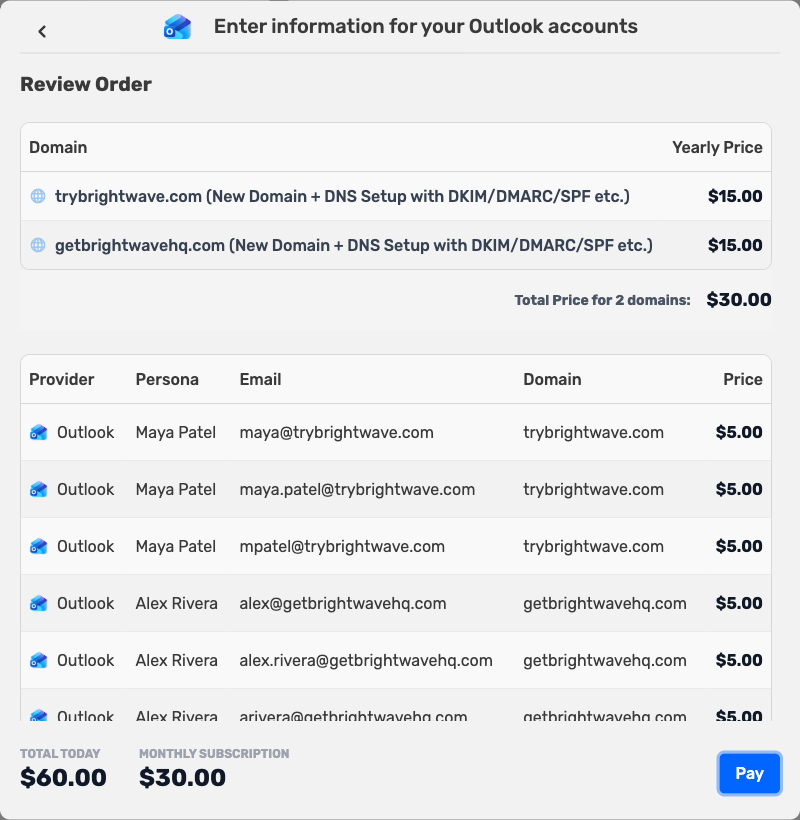
The Review Order page displays a summary of your purchase.
- The domain section shows the selected domain and yearly price.
- The accounts table lists each Outlook mailbox: Provider, Email address, Domain, and Price.
- Total Today and Monthly Subscription totals. See Understanding your order total.
- Click Pay to proceed to checkout (if you already had card details saved in SalesBlink then payment will be completed automatically).
Step 9: Complete Payment
The Step 3: Payment page opens.
- If you do not have card details stored in SalesBlink then a modal for adding the card details will appear, enter your Card details there.
- The card will be saved for future transactions.
- Click Pay to complete the purchase.
Tip: SalesBlink handles all technical setup including DNS records, SPF, DKIM, DMARC, and domain redirection. Your mailboxes are generally delivered within 3 hours, but it can take up to 24-48 hours in some cases due to DNS propagation.
Path B: Connect an Existing Domain with Outlook Mailboxes
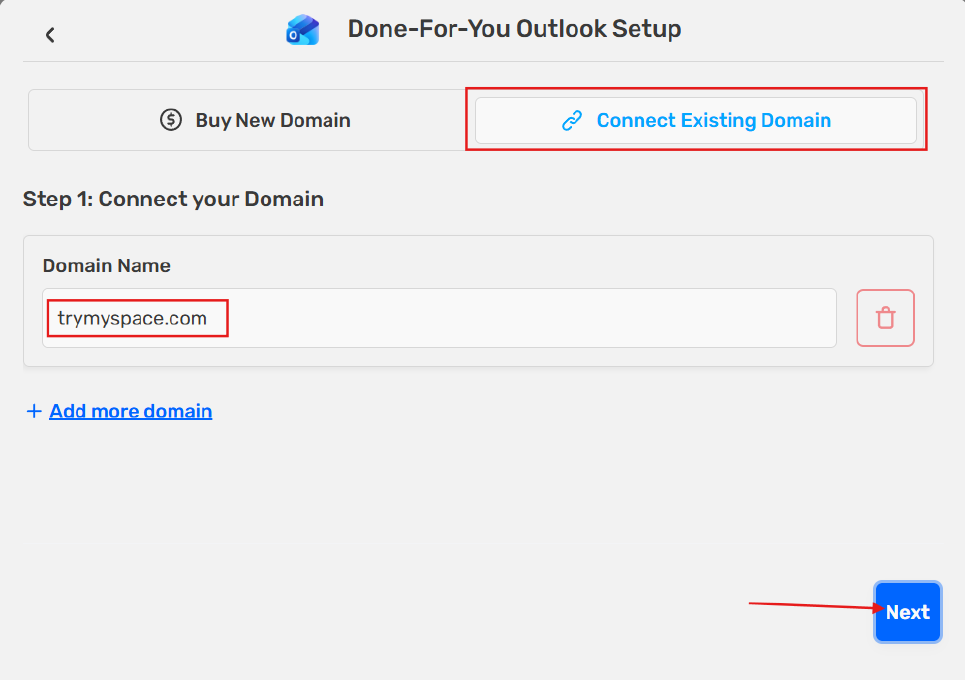
Step 1: Choose Connect Existing Domain
On the Done-For-You Outlook Setup page:
- Click the Connect Existing Domain tab.
Step 2: Enter Your Domain Name
Under Step 1: Connect your Domain, enter the domain you already own.
- Type your domain name in the Domain Name field (for example, trymyspace.com).
- Click + Add more domains if you want to connect additional domains.
- Click Next to continue.
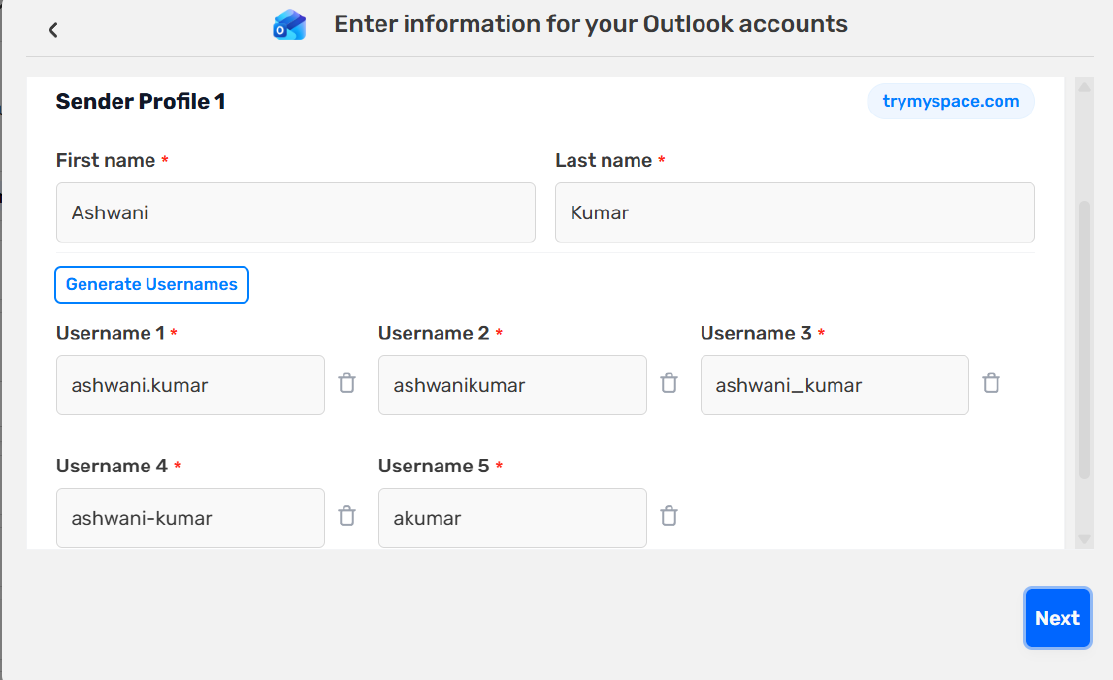
Step 3: Create Sender Profiles
Same as Path A - fill in sender profile information.
- Enter First name and Last name.
- Click Generate Usernames to auto-create username variations.
- Review and adjust usernames as needed.
- Click Next.
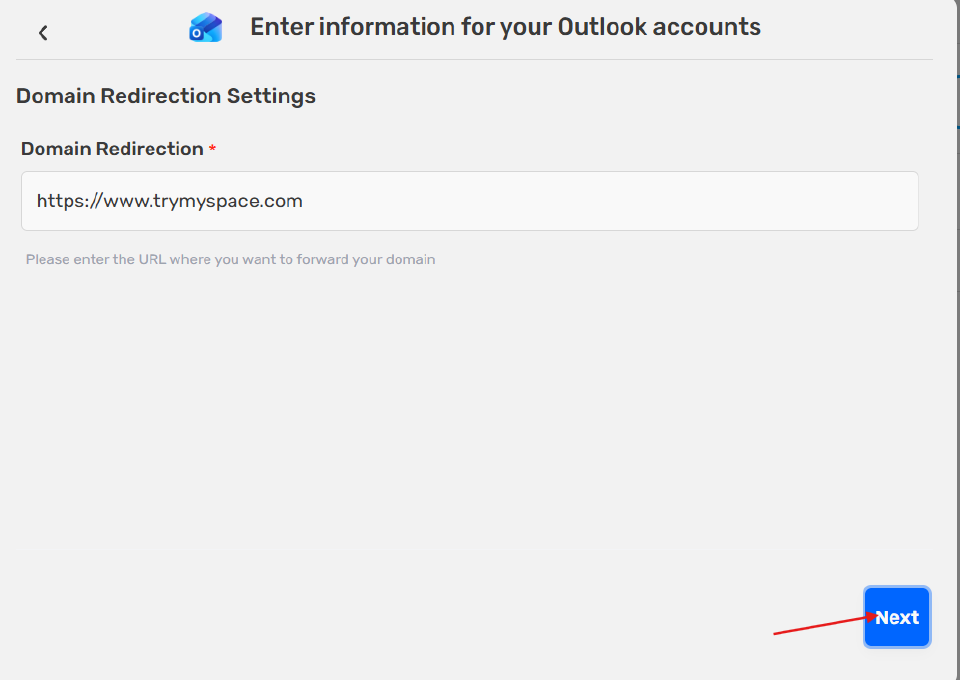
Step 4: Set Domain Redirection
The Domain Redirection Settings page appears.
- Enter the URL where you want to forward your domain (for example, https://www.trymyspace.com).
- Click Next to proceed.
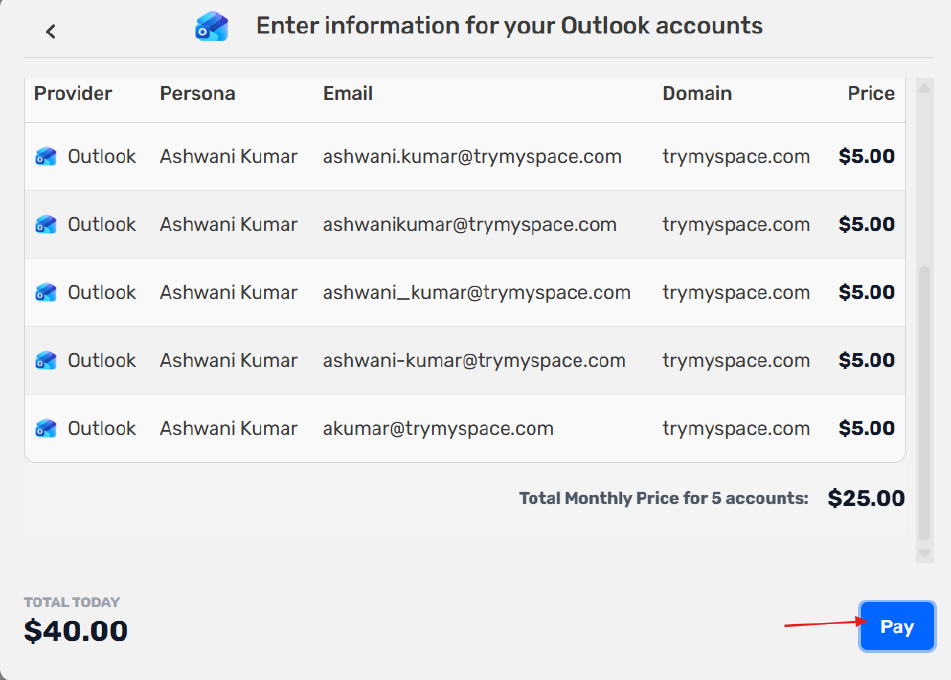
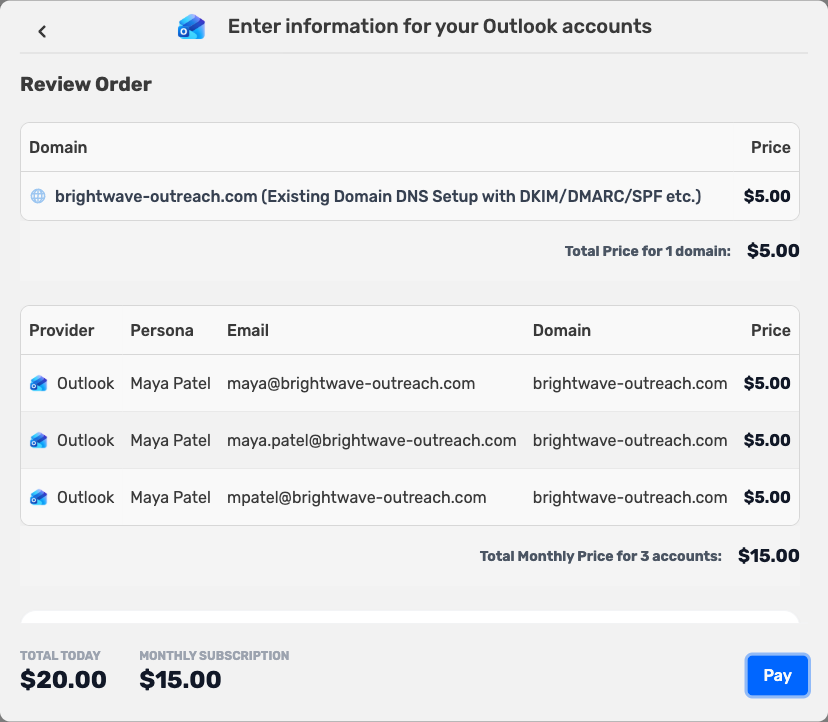
Step 5: Review Order and Pay
The Review Order page shows your existing domain and mailboxes.
- Domain shows as trymyspace.com (existing domain) with a fee.
- Each Outlook account is a price per month.
- Total Today reflects the domain fee plus the first month of mailboxes. See Understanding your order total.
- Click Pay to complete the checkout (if you already had card details saved in SalesBlink then payment will be completed automatically).
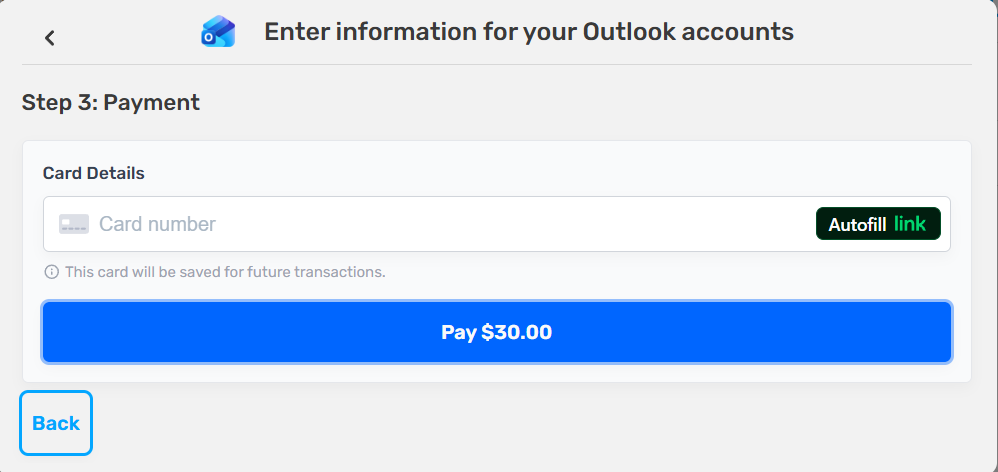
Step 6: Complete Payment
Enter your card details and click the Pay button to finalize.
Understanding your order total
The Review Order page shows two totals:
- Total Today: What you pay now. This is the domain cost ($15 per year for each new domain, or a one-time $5 for each existing domain you connect) plus the first month of mailboxes.
- Monthly Subscription: The recurring mailbox charge, at $5 per mailbox per month.
Order confirmation
After payment, the Order Successful! screen confirms your order. What you see next depends on your domain:
- No nameserver change needed: Your mailboxes are added to your SalesBlink account within 24 hours. Click Okay, Got it.
- Nameserver change needed: An Action Required: Update Nameservers box lists the nameservers for each domain. Update them at your domain registrar, tick I have updated the nameservers, then click Complete Order. Your order completes within 24 hours of the update.
Both buttons open Account → Billing → Subscriptions, where you can see your order.
After you order
- Update your nameservers. If you connected an existing domain, the nameservers are in your order email. If you can't find it, ask support to resend it.
- Wait for provisioning. Mailboxes are generally ready within 3 hours. For an existing domain, setup can take up to 24 hours after your nameserver change propagates. You receive a confirmation email when the mailboxes are ready.
- Expect early Domain Setup Report warnings. Warnings in the Domain Setup Report for the first 12–48 hours are normal while DNS propagates.
- No email senders found: If you see this on Outreach → Email Senders after receiving the confirmation email, check that you are in the correct workspace. DFY mailboxes are added to the workspace you ordered from. See Workspaces.
- Never change the nameservers back. Changing them breaks DKIM and email receiving, and cancels the subscription.
- Avoid renaming mailbox addresses. Changing a mailbox's username makes it a new mailbox, and its warmup starts over.
What you get
- Mailboxes for SalesBlink only. You do not get webmail, Microsoft 365 admin center, or DNS access. DFY mailboxes can't be moved to other cold email tools.
- App password on request. If you need to log in to a mailbox, ask support for an app password.
- Forwarding and redirects through support. Contact support to change email forwarding or your domain redirect.
- Mailbox names from your profile. Mailboxes use the sender profile (first and last name) you entered during the order. To change the display name, send support the new first and last name. Changes take 24–48 hours.
- Subscription management. You can add or remove mailboxes and domains from Account → Billing → Subscriptions. See How to Manage Your DFY Mailbox Subscriptions.
What SalesBlink Sets Up Automatically
After purchase, SalesBlink handles all technical configuration. No manual DNS or server setup is required.
- Daily sending limit: 30-35 emails per account per day
- Inbox optimization: Configured for maximum inbox placement
- Authentication: Automatic SPF, DKIM, and DMARC records
- DNS setup: Best-practice DNS configuration applied
- Domain redirection: Stealth domain redirection enabled
- Delivery time: Mailboxes are generally ready within 3 hours, but it can take up to 24-48 hours due to DNS propagation.
Troubleshooting
Domain Search Shows Unavailable
- Try a different domain name or variation.
- Use the Show suggested domains option for alternatives.
Username Generation Fails
- Ensure both First name and Last name fields are filled.
- You can manually edit any username field after generation.
Payment Declined
- Verify your card has sufficient funds.
- The card is saved for future transactions. Contact your bank if issues persist.
Mailboxes Not Delivered Within Expected Time
Mailboxes are generally ready within 3 hours, but it can take up to 24-48 hours due to DNS propagation.
- Check your Email Senders page for status updates.
- Contact SalesBlink support at https://salesblink.io/contact-us.
Understanding DNS Propagation
DNS propagation is the time it takes for updates to your domain's DNS records (such as SPF, DKIM, DMARC, and MX records) to spread across the internet. When SalesBlink configures your mailbox, these records are published to global DNS servers. Internet service providers and email servers around the world periodically refresh their cached copies of these records, and until they do, they may not see the latest configuration.
Because of this caching, even though we set up everything immediately, some servers may not recognize the new records right away. This is a normal part of how the internet works and is outside of SalesBlink's direct control. Most propagation completes within a few hours, but in rare cases it can take up to 24-48 hours.
Nameserver Conflicts (Existing Website on Domain)
Do not use your main business domain for cold email. For cold email outreach, always use a burner domain or purchase a domain directly through SalesBlink.
If you already have a website on your domain:
- You can still buy DFY mailboxes, but you must point your domain's nameservers to SalesBlink
- This will break your existing website unless you set up a redirect
- During purchase, enter your main website URL in the Domain Redirection Settings. SalesBlink will redirect your domain to your main site
Alternative: Buy a new burner domain specifically for cold email. This protects your main domain's reputation and avoids any website downtime.
Can I Use My Main Domain?
No. Using your main domain for cold email risks damaging its reputation. If the domain gets flagged or blacklisted, your primary website and transactional emails will be affected. Always use a separate burner domain for outreach.
Frequently Asked Questions
Why am I charged every 28 days if DFY mailboxes are a monthly subscription?
DFY mailboxes are a monthly subscription, but the payment is collected every 28 days. Microsoft expects payment for mailboxes every 30 days and cancels mailboxes that aren't paid on time. Charging 2 days early leaves time to collect the payment before that happens. If SalesBlink doesn't receive the payment within 48 hours, the subscription is cancelled and the mailboxes are released.