Overview
Test and monitor where your emails land across major providers. See exactly how many hit the Inbox, Spam, Promotions, or Updates folder before you launch a campaign.
What Is an Inbox Placement Test?
Inbox Placement Test answers one critical question: after your email reaches the recipient's mail server, which folder does it land in?
This is different from deliverability. Deliverability only tells you whether the email reached the server. Placement tells you where it went after that.
- Deliverability = Did the email reach the building?
- Placement = Did it reach the person's desk or the trash room?
A single test reveals exactly:
- What percentage lands in the Primary Inbox.
- What percentage lands in Spam.
- What percentage lands in Promotions, Updates, or Other tabs.
- Provider-specific breakdowns across Gmail, Outlook, Zoho Mail, and Hotmail.
Why it matters: Even 20-30% spam placement can destroy campaign ROI. A placement test catches this before you scale.
SalesBlink offers two test modes:
- Automated: Recurring tests that run on a schedule. Ideal for ongoing campaigns where you want to track inbox placement over time.
- One-Time: A single test that runs immediately. Best for one-off campaigns or quick deliverability checks before a launch.
For One-Time tests, choose how to send:
- From SalesBlink (Recommended): Uses your connected SalesBlink sender and an existing sequence or template. Fastest setup.
- From Outside: Send the test email yourself from any email client. Lets you test providers or email copy not stored in SalesBlink.

Prerequisites
Before you start, confirm you have the following:
- At least one connected email sender: Set up in Outreach > Email Senders. Required for the From SalesBlink method.
- An existing sequence or email copy: Required if testing from SalesBlink.
How to Run an Automated Test
Step 1: Open Inbox Placement Test
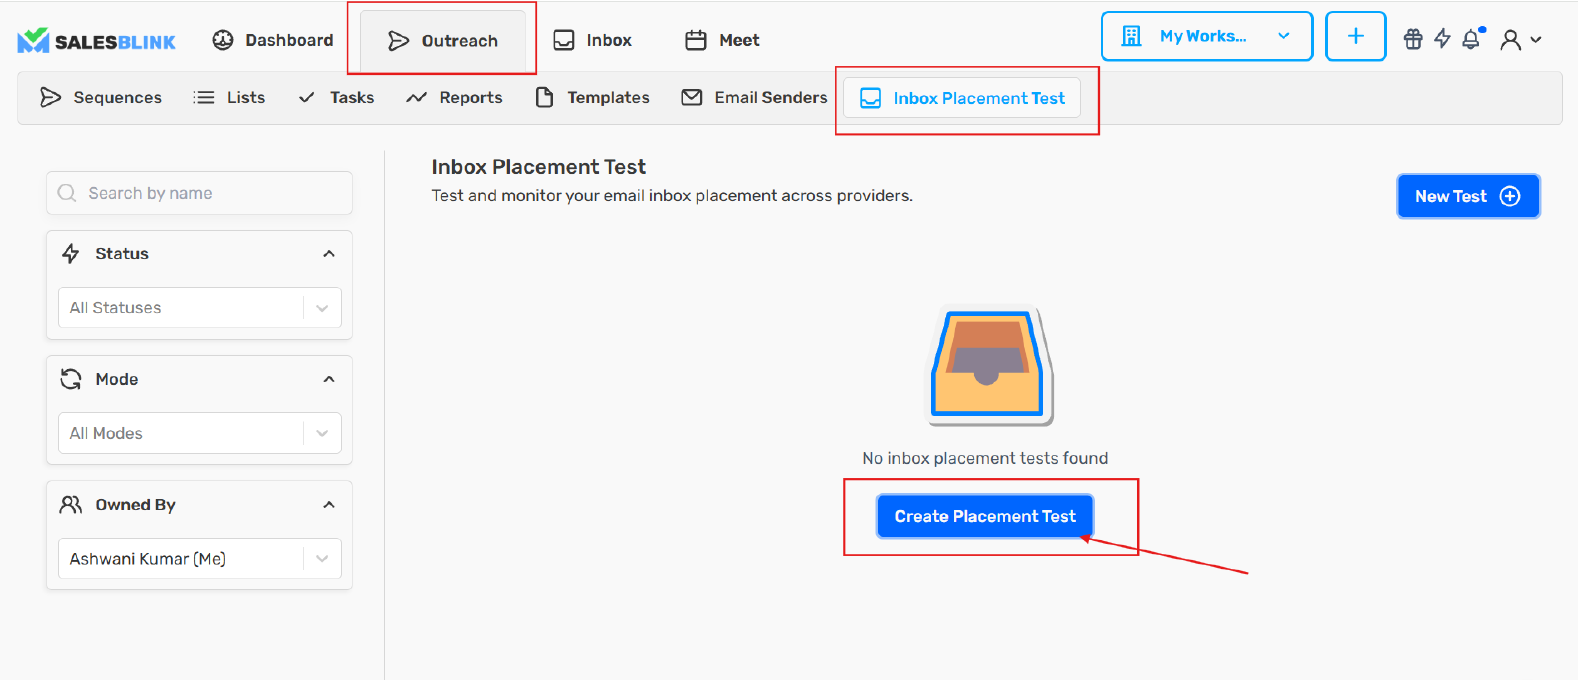
From the SalesBlink dashboard, click the Outreach tab in the Top Navbar.
- Click the Inbox Placement Test tab in the Top Navbar.
- If this is your first test, click Create Placement Test. Otherwise, click New Test.
Step 2: Select Automated Mode
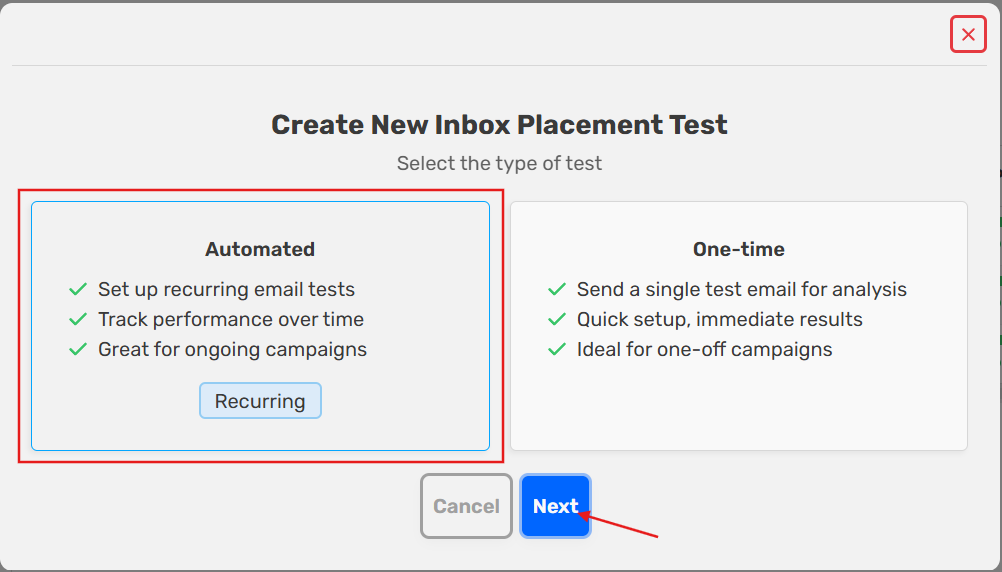
- Click the Automated card on the left.
- Click Next.
Step 3: Configure the Automated Test
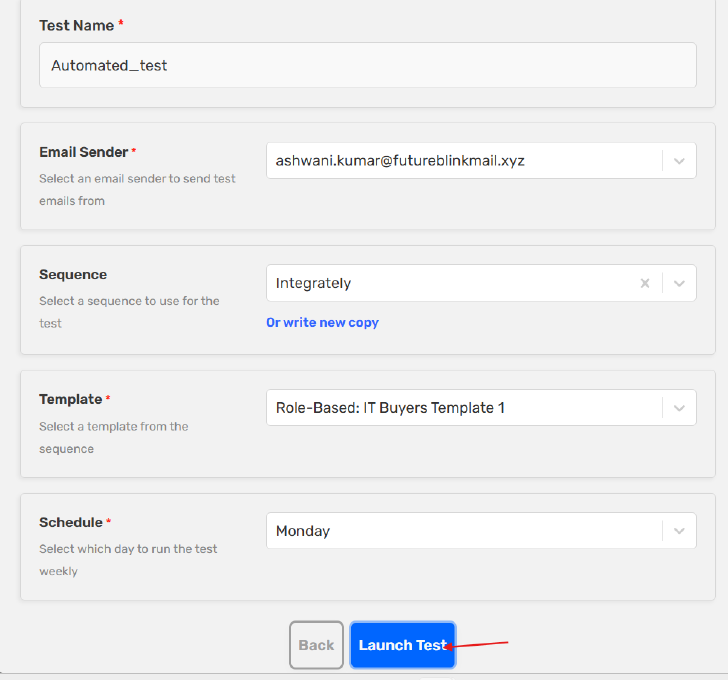
- Test Name: Enter a descriptive name (for example, Automated_test).
- Email Sender: Select a connected sender from the dropdown (for example, ashwanl.kumar@futureblinkmail.xyz).
- Sequence: Select an existing sequence from the dropdown (for example, Integrately).
- Template: Select a template from the sequence (for example, Role-Based: IT Buyers Template 1).
- Alternatively, click Or write a new copy to paste custom email content.
- Schedule: Select which day of the week to run the test weekly (for example, Monday).
- Click Launch Test to activate the recurring test.
Tip: Pick a consistent day for your weekly test. Monday mornings let you review results and adjust copy before the week starts.
Step 4: View and Manage the Automated Test
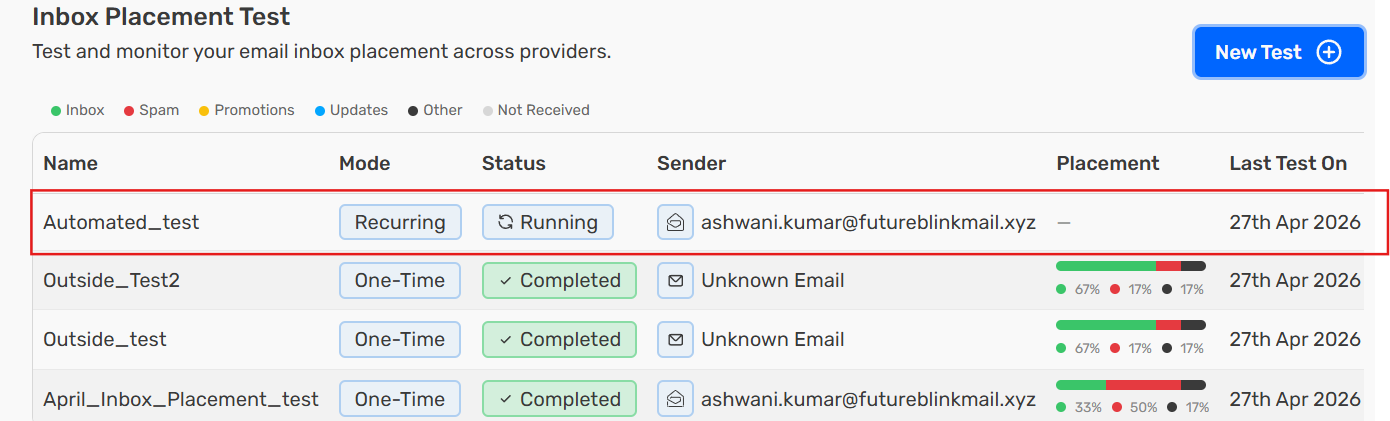
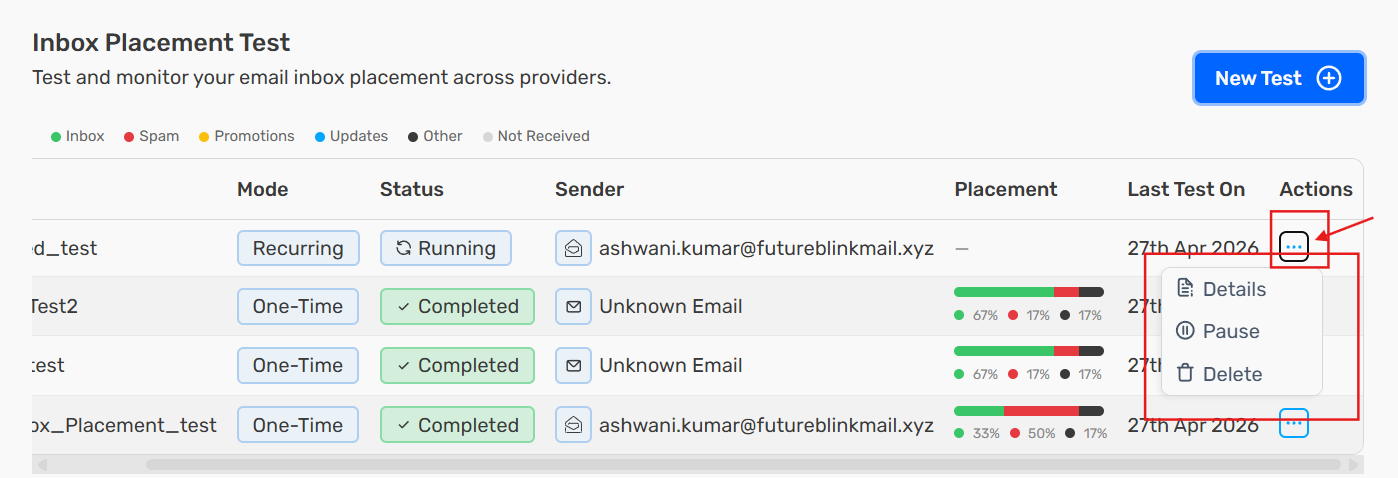
- Mode shows as Recurring.
- Status shows as Running.
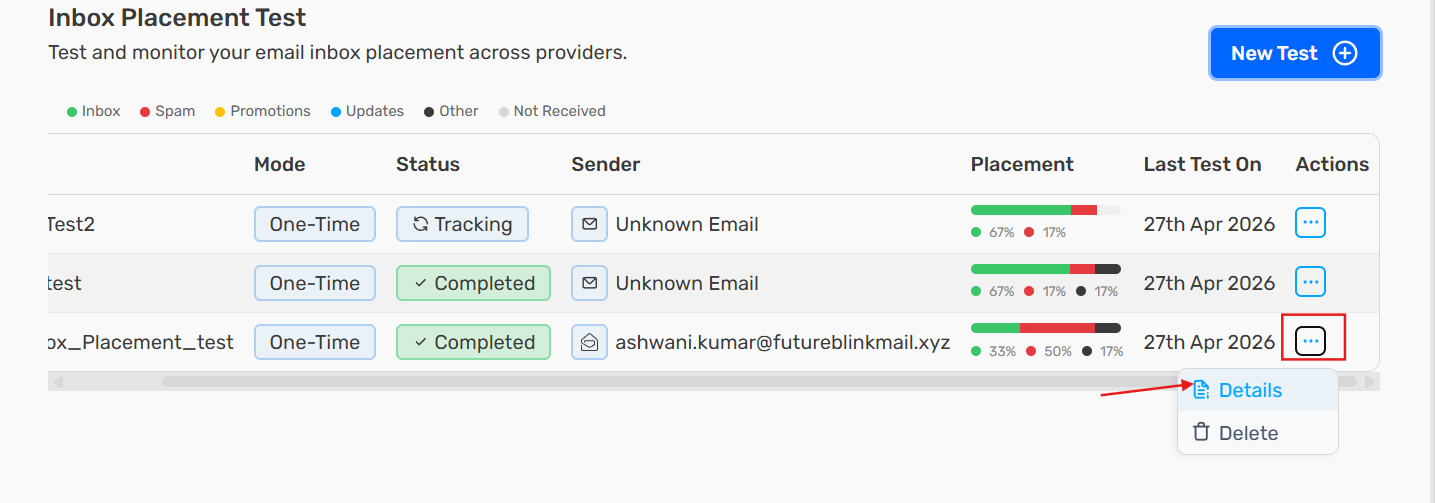
- Click the three-dots menu in the Actions column to open the dropdown.
- Select Details to view the full report after a scheduled run completes. You can also click the test name to open its details.
- Select Pause to temporarily stop the recurring test without deleting it.
How to Run a One-Time Test
Step 1: Open Inbox Placement Test
Navigate to Outreach > Inbox Placement Test. Click New Test or Create Placement Test.

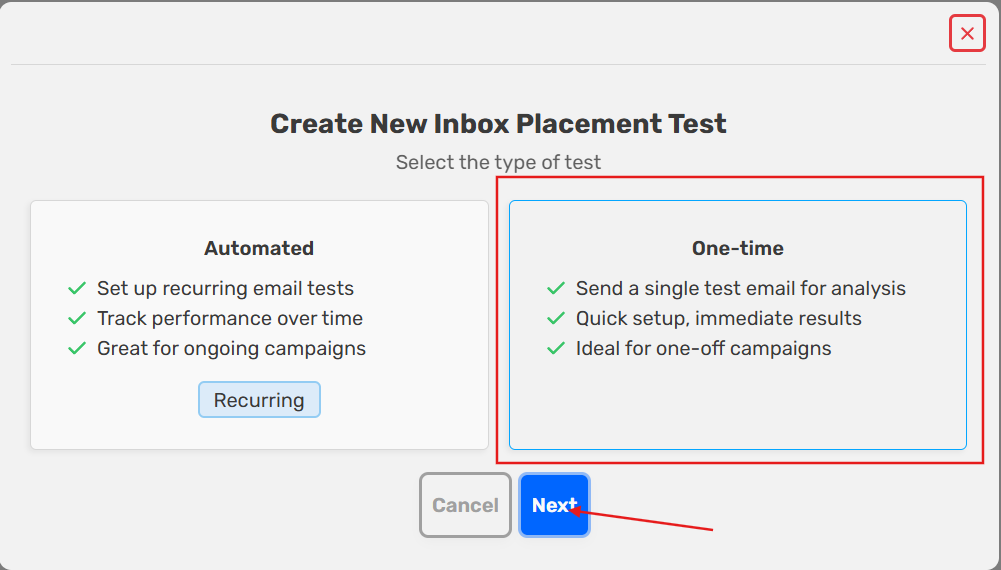
Step 2: Select One-Time Mode
- Click the One-time card on the right.
- Click Next.
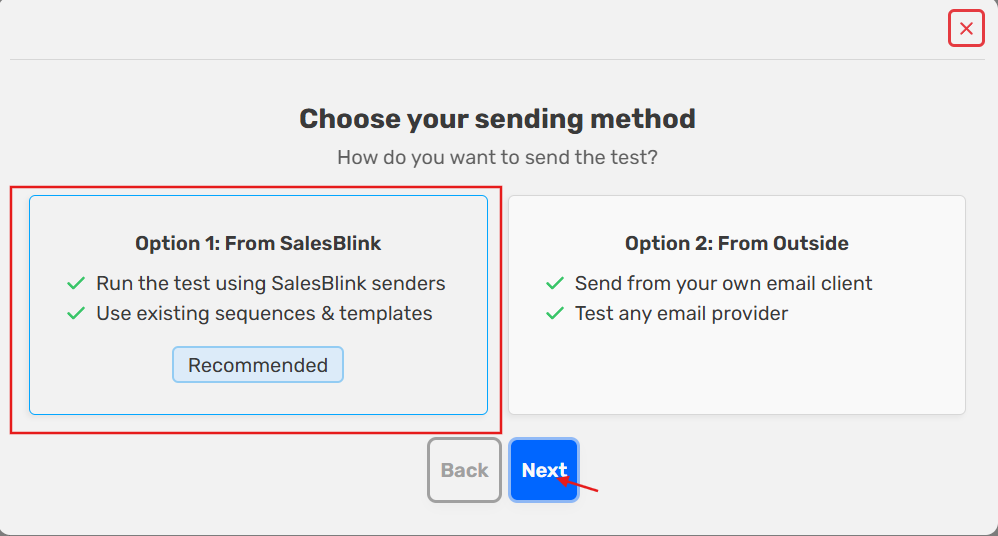
Step 3: Choose From SalesBlink (Recommended)
- Click Option 1: From SalesBlink.
- Click Next.
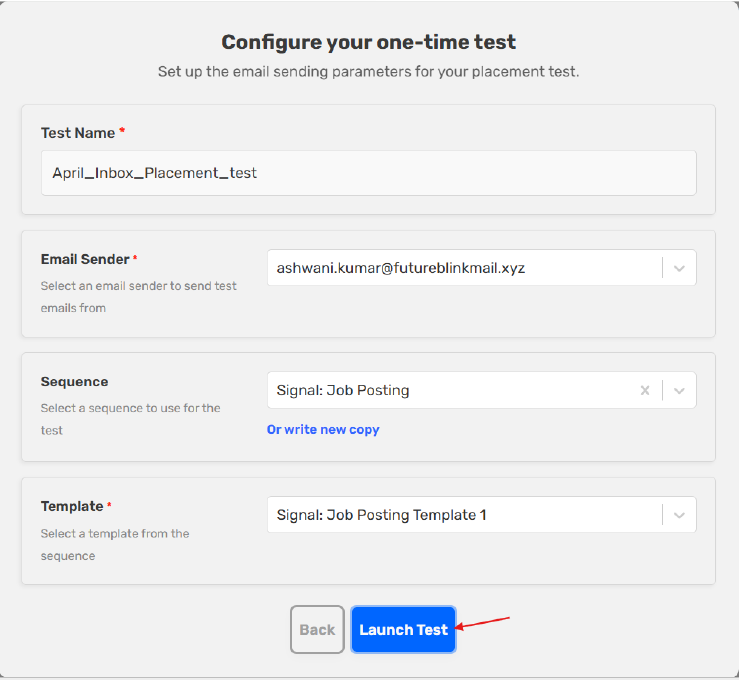
Step 4: Configure the Test
- Test Name: Enter a descriptive name (for example, April_Inbox_Placement_test).
- Email Sender: Select a connected sender from the dropdown (for example, ashwanl.kumar@futureblinkmail.xyz).
- Sequence: Select an existing sequence from the dropdown (for example, Signal: Job Posting).
- Template: Select a template from the sequence (for example, Signal: Job Posting Template 1).
- Alternatively, click Or write a new copy to paste custom email content.
- Click Launch Test to start the test immediately.
Tip: Use a clear naming convention so you can identify tests later. Include the date and campaign name in the test name.
Step 5: View Test Status
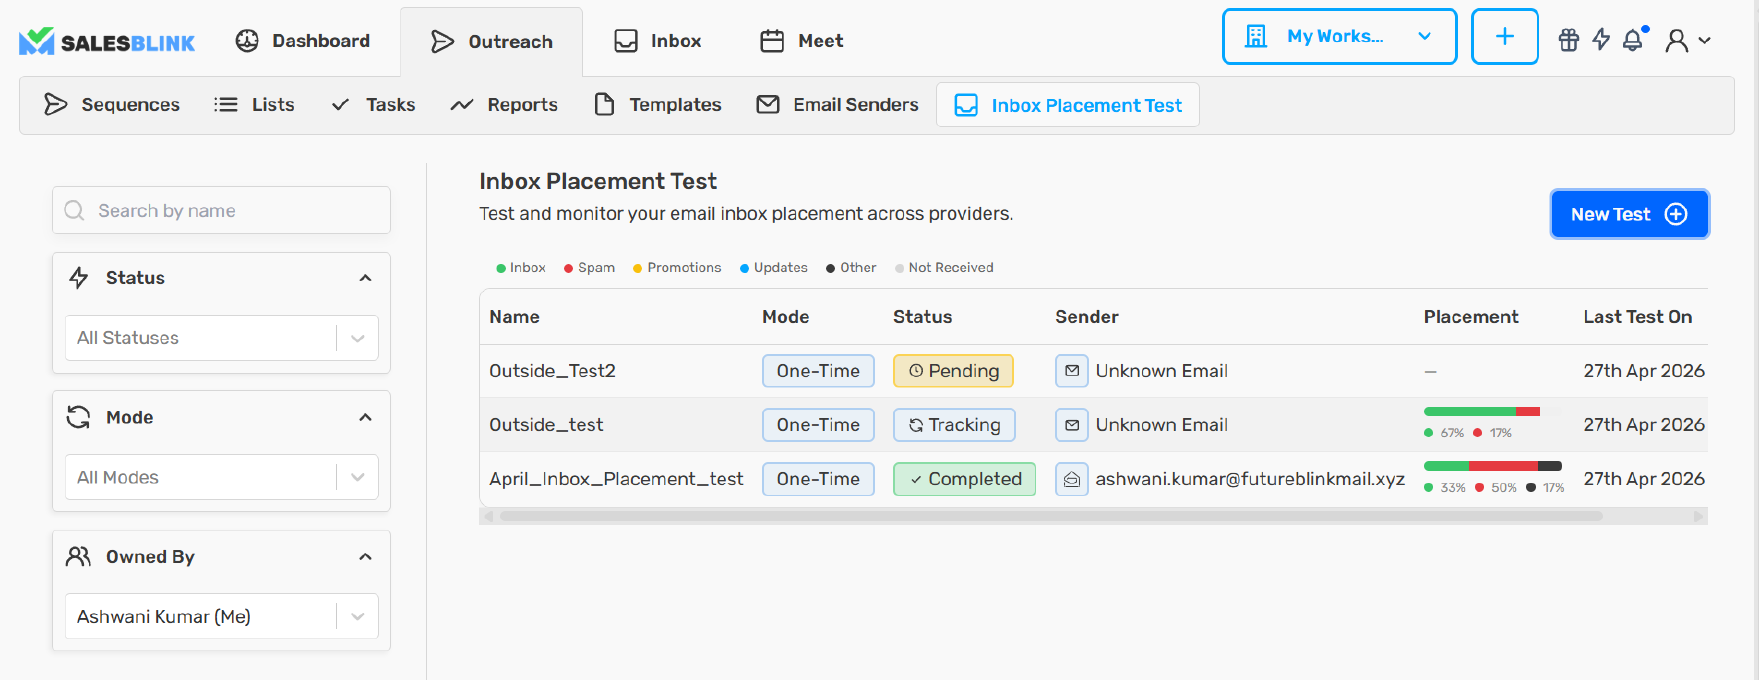
- Status cycles through Pending, Tracking, and Completed. This typically takes a few minutes.
- The Placement column shows a color-coded progress bar: Green for Inbox, Red for Spam, Black for Other, Gray for Not Received.
- Wait for the status to change to Completed before viewing the full report.
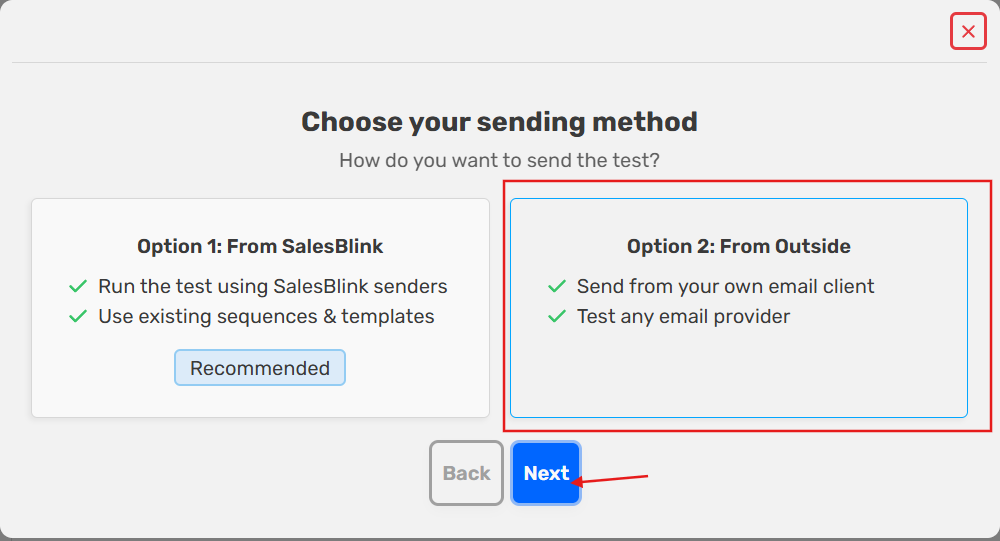
Step 3 (Alternative): Choose From Outside
- On the Choose your sending method page, click Option 2: From Outside.
- Click Next.
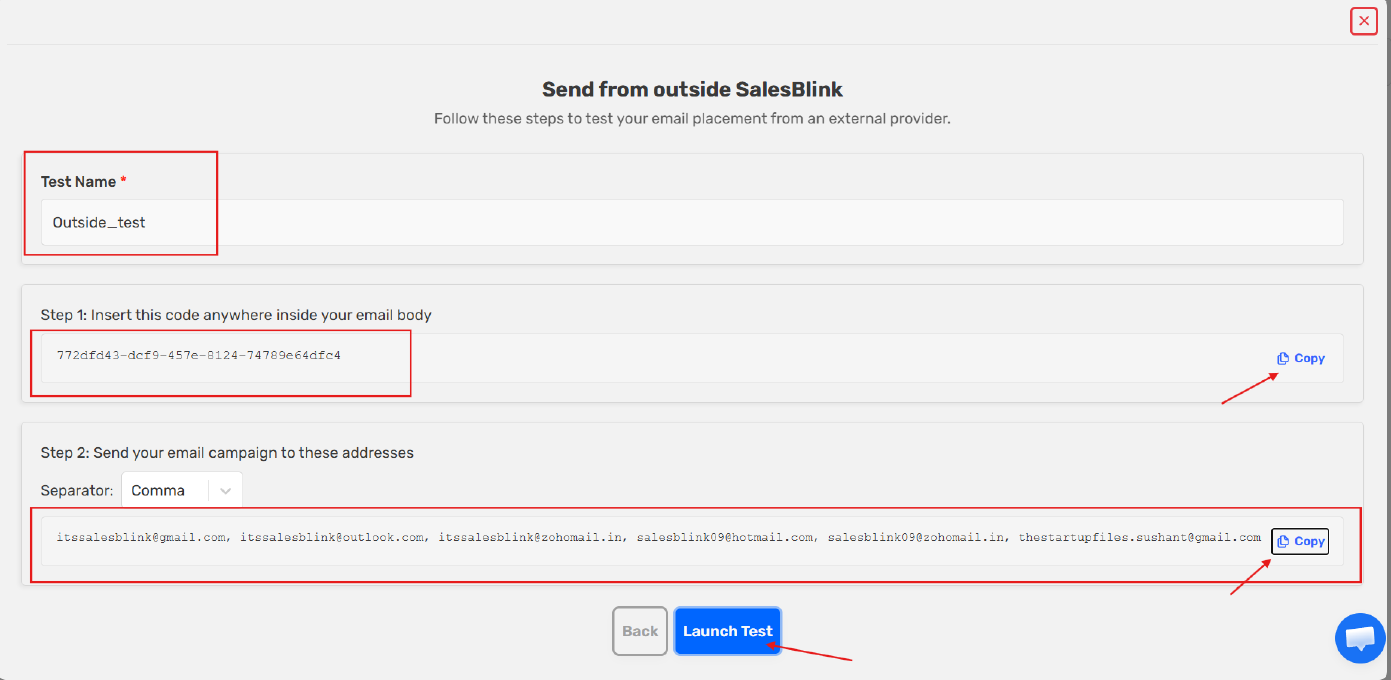
Step 4 (Alternative): Configure the External Test
- Test Name: Enter a descriptive name (for example, Outside_test).
- Step 1: Copy the unique tracking code. Click the Copy button next to the code block. This code must appear anywhere inside your email body.
- Step 2: Copy the test email addresses. Click the Copy button to copy all seed addresses at once. Use the Separator dropdown to switch between Comma and other formats if needed.
- Open your email client (Outlook, Gmail, Apple Mail, etc.).
- Create a new email. Paste the copied seed addresses into the To field.
- Paste the tracking code anywhere inside the email body.
- Write your subject line and email copy as you would for a real campaign.
- Send the email.
- Return to SalesBlink and click Launch Test to begin tracking.
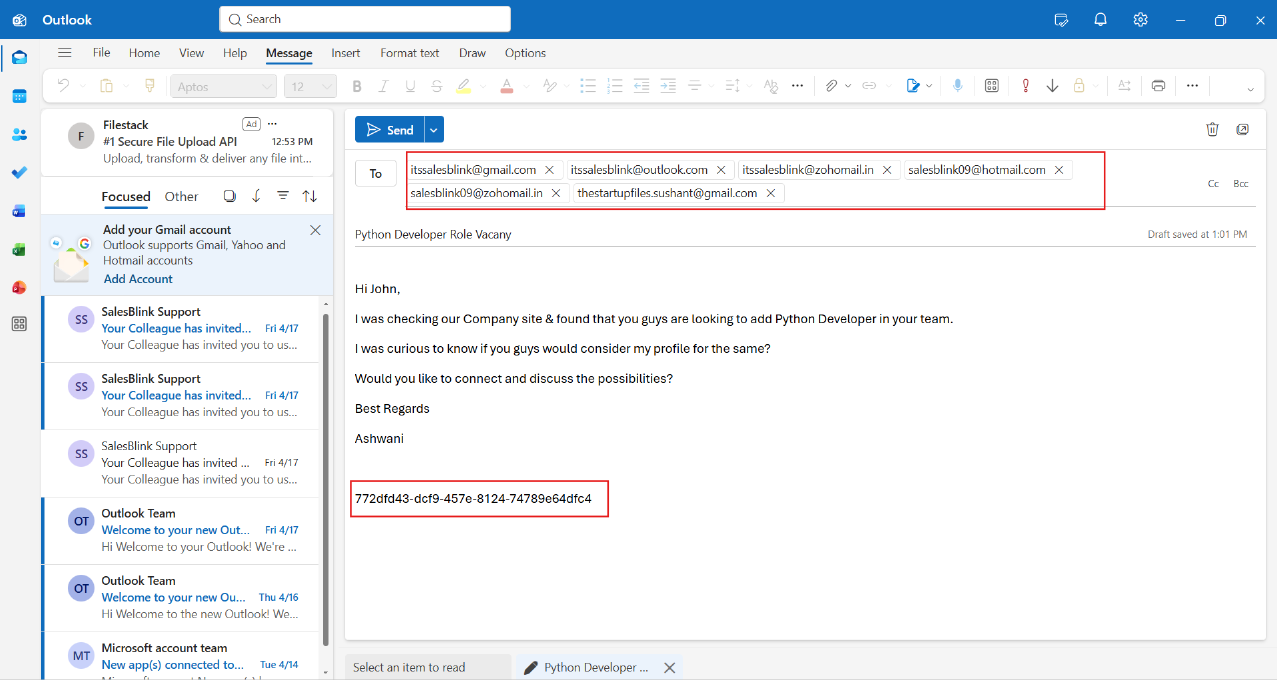
Note: The tracking code is unique to each test. Do not modify it. SalesBlink uses this code to identify and track your email across all seed addresses.
Filter tests
Use the filter bar on the Inbox Placement Test page to find specific tests:
- Search by name: Find a test by its name.
- All Statuses: Show only tests with a given status (Pending, Sending, Tracking, Completed, Failed, or Stopped).
- All Modes: Show only One-time or Recurring tests.
- Select User: Show tests owned by a specific team member. Available to account owners only.
Active filters appear as chips above the list. Remove a single filter from its chip, or click Clear all to reset every filter.
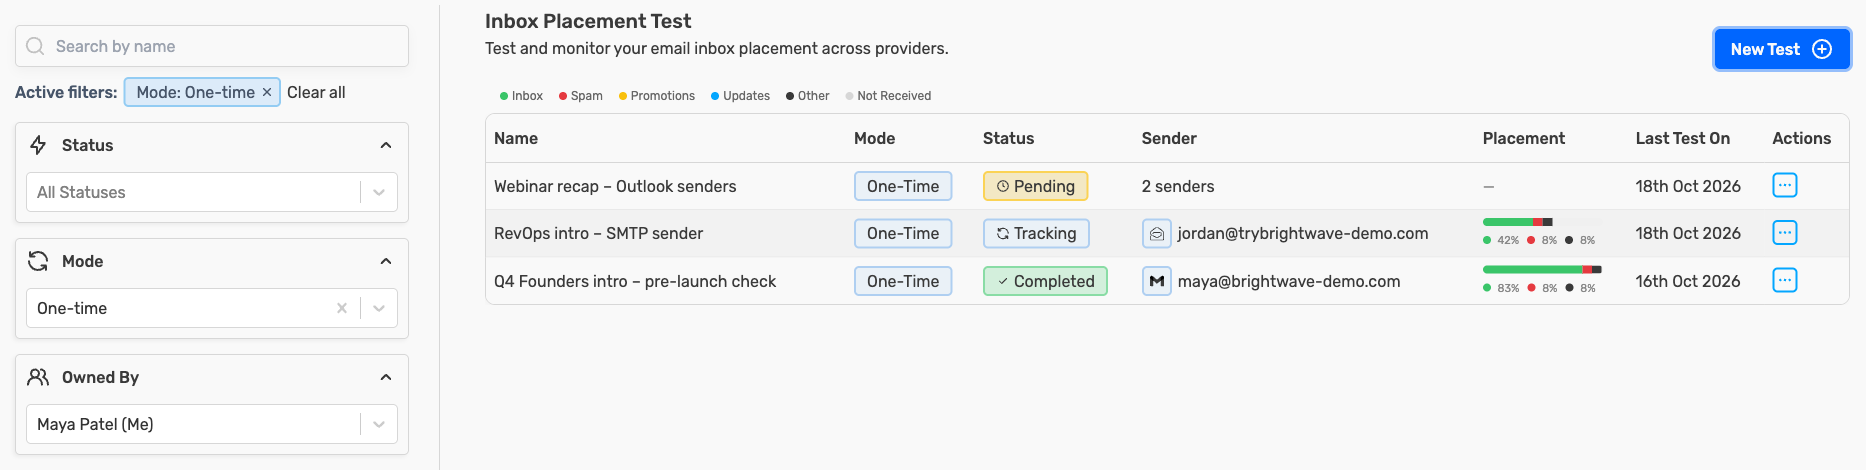
Note: If you remove an email sender, its past tests still show the sender's email address. If the address can't be found, the Sender column shows Sender was Removed.
How to Understand Your Report
Open the Report
- Click the test name in the list.
- Alternatively, click the three-dots menu icon in the Actions column for your test and select Details from the dropdown.
Summary Cards
- Total: Total number of test emails sent to seed addresses.
- Inbox: Count and percentage that landed in the primary inbox. This is your target.
- Spam: Count and percentage flagged as spam. Lower is better.
- Promotions: Count sorted into the Promotions or Social tab.
- Updates: Count sorted into the Updates tab.
- Other: Count sorted into other folders or categories.
- Not Received: Count of seed addresses that did not receive the email at all.

Email Placement Table
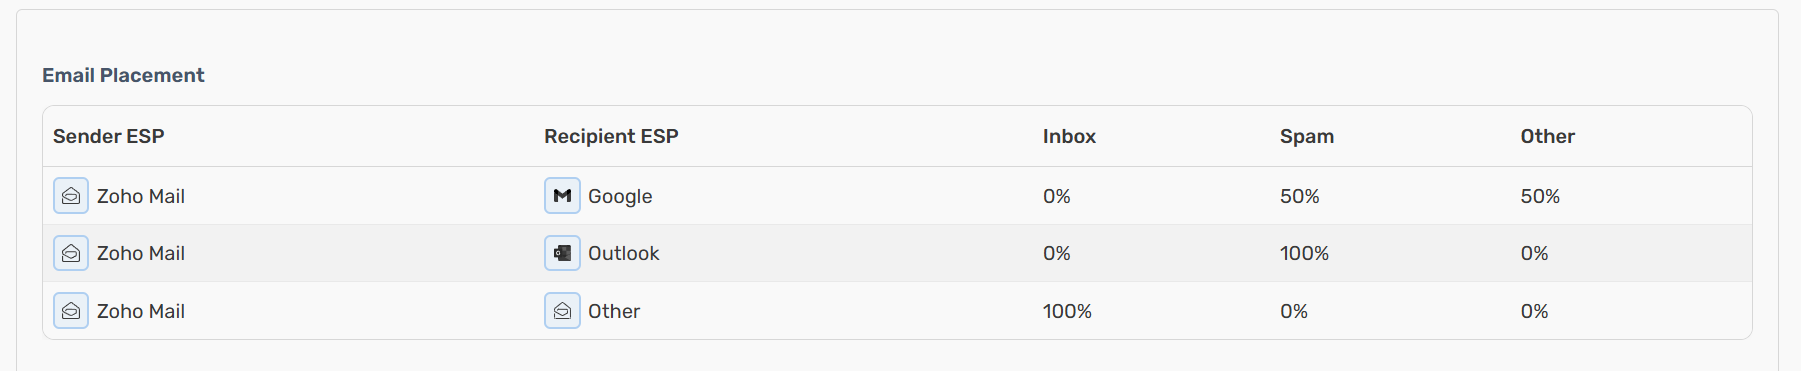
- Sender ESP: The outgoing email service (for example, Zoho Mail or Unknown ESP for external sends).
- Recipient ESP: The receiving provider (Google Gmail, Microsoft Outlook, or Other).
- Inbox / Spam / Other: Percentage breakdown for each sender-to-recipient pair.
- Use this table to identify which provider combinations perform best.
Deliverability Insights
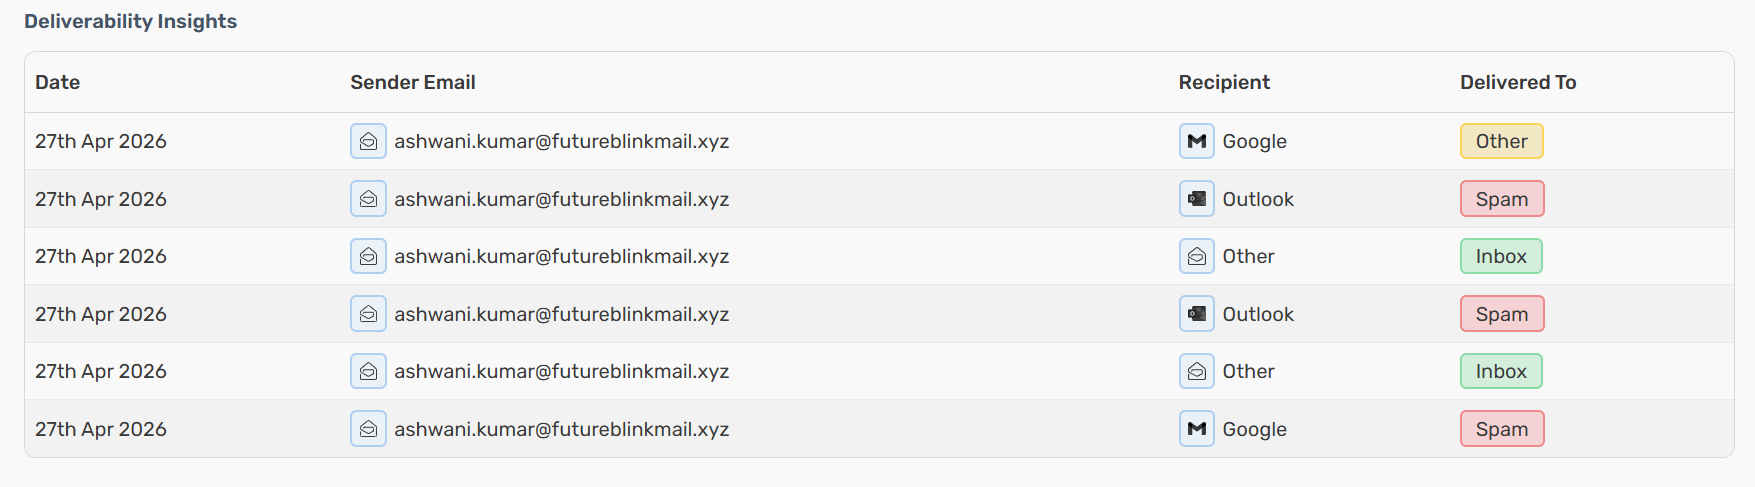
- Date: When the email was processed.
- Sender Email: The address that sent the test.
- Recipient: The receiving provider (Google, Outlook, Other).
- Delivered To: Final folder with a color-coded badge: Green for Inbox, Red for Spam, Yellow for Other.
Template Analysis
- Words: Total word count. Aim for 50-150 words.
- Personalization: Number of template variables used. At least 2 is recommended.
- Links: Number of URLs. Minimize to avoid spam filters.
- Images: Number of embedded images. Maximum 1 recommended.
- Questions: Number of question marks. 1-2 recommended.
- Attachments: Number of file attachments. Avoid too many.
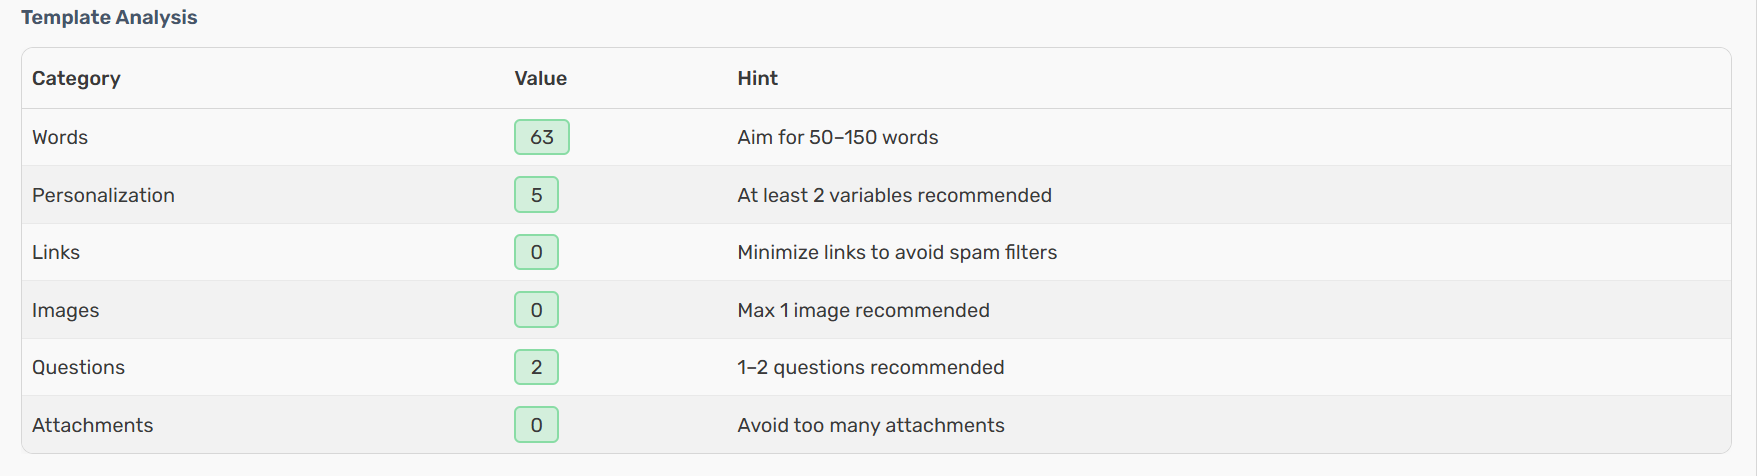
Tip: If any Template Analysis row shows a yellow or red value, edit your template and re-run the test. Small copy changes can significantly improve inbox placement.
Domain Blacklist Check
- Domain: Your sending domain (for example, futureblinkmail.xyz).
- Domain Blacklist Count: Number of blacklists the domain appears on. A count of 0 means the domain is clean.
This check tests your mail server IP address against over 100 DNS-based email blacklists (commonly called Realtime Blacklists, DNSBL, or RBL), following the same standard practice as MXToolbox.com. If your mail server has been blacklisted, some emails you send may not be delivered.

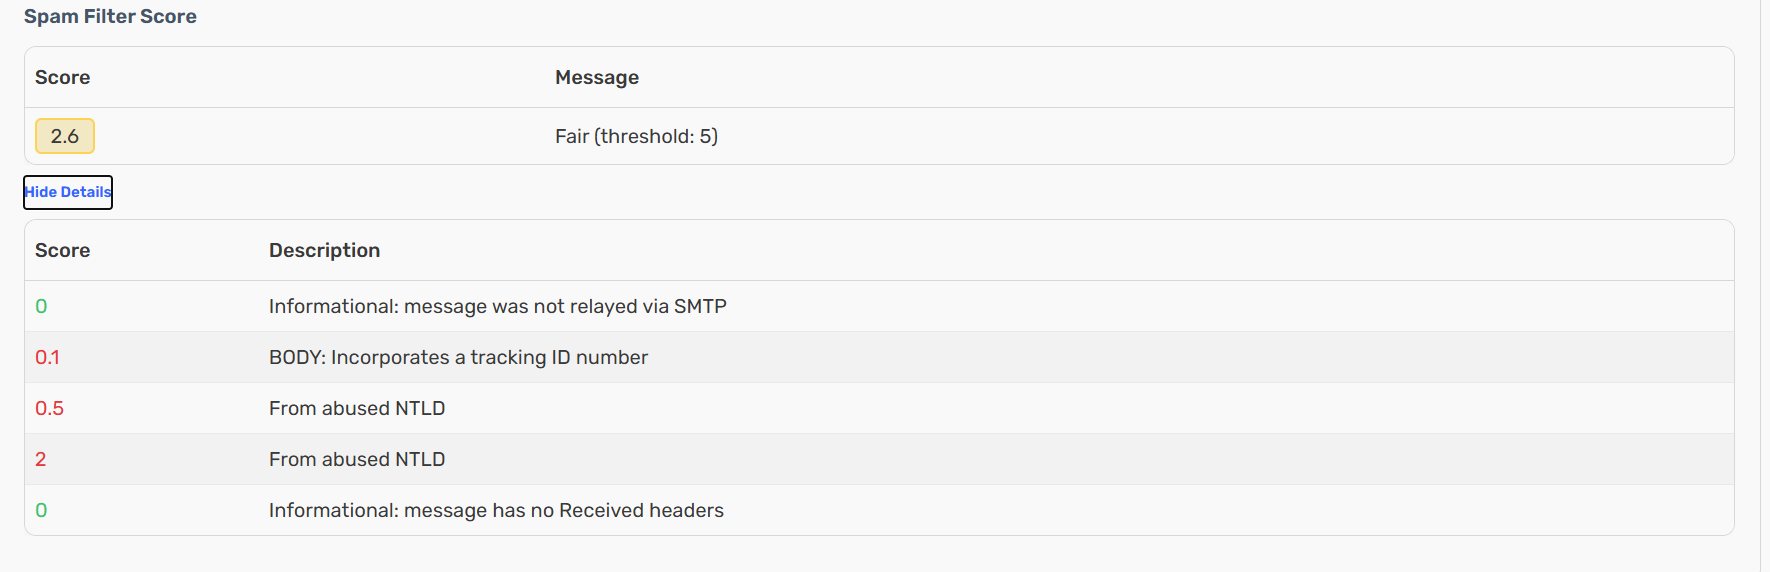
Spam Filter Score
- Score: Overall spam score. Lower is better. The threshold is 5. A score below 5 is Fair or Good.
- Message: Rating label (for example, Fair with threshold of 5).
- Detailed Breakdown: Each row explains a specific factor and its contribution to the score.
Test Settings
- Name: The test name you entered during setup.
- Mode: Automated or One-time.
- Source: From SalesBlink or From Outside.
- Content Type: Sequence or Custom Copy.
- Sender: The email address used to send the test.
- Created: Date and time the test was launched.

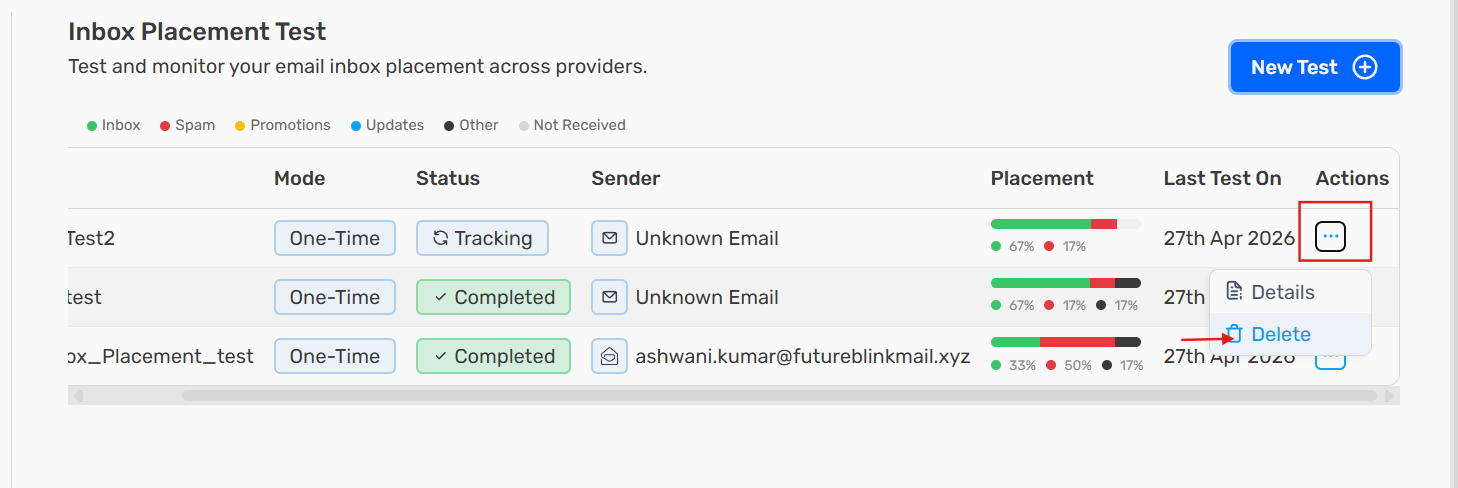
Delete a Test
- Click the three-dots menu in the Actions column.
- Select Delete from the dropdown.
Troubleshooting
Test Stays on Pending or Tracking
- Wait up to 15 minutes for seed addresses to process the email.
- For external tests, verify you sent the email and included the tracking code exactly as copied.
- Check that the email was not blocked by your own email client.
High Spam Rate
- Review the Template Analysis section and fix any flagged issues.
- Reduce links, images, and attachments in your email copy.
- Check the Spam Filter Score breakdown and address high-scoring factors.
- If the Domain Blacklist Count is above 0, consider using a different sending domain.
- If your sender health is high but spam placement persists, the issue may be cross-provider filtering (for example, Google → Outlook). See Inbox Placement Test Shows Spam Despite High Sender Health.
Not Received Emails
- Verify the sender address is properly connected and authenticated in Email Senders.
- For external tests, confirm the email was actually sent and not stuck in drafts.